Before you start
What you need
Owner or admin in flashtimer
Connecting an integration is up to your organization's owners and admins.
A Mailchimp login
For the Mailchimp account whose campaigns should get your timers. If someone else manages it, ask them to connect it, or to give you a login.
Pro plan and up
Connecting Mailchimp and adding timers to campaigns from flashtimer are on Pro and up. Pasting a timer's HTML into Mailchimp yourself works on every plan.
Video
Watch the setup
The whole connection in 42 seconds, start to finish. The steps below go through the same screens one at a time.
Step by step
Connect Mailchimp
Click Connect with Mailchimp, log in to Mailchimp, and you're back in flashtimer, connected. An API key from Mailchimp works too, if you'd rather paste one.
- In flashtimer
Step 1: Open Integrations and click Connect with Mailchimp
In flashtimer, go to Settings → Integrations and click Connect on the Mailchimp card.
Click Connect with Mailchimp. flashtimer sends you to Mailchimp to log in; there's no key to make.
app.flashtimer.com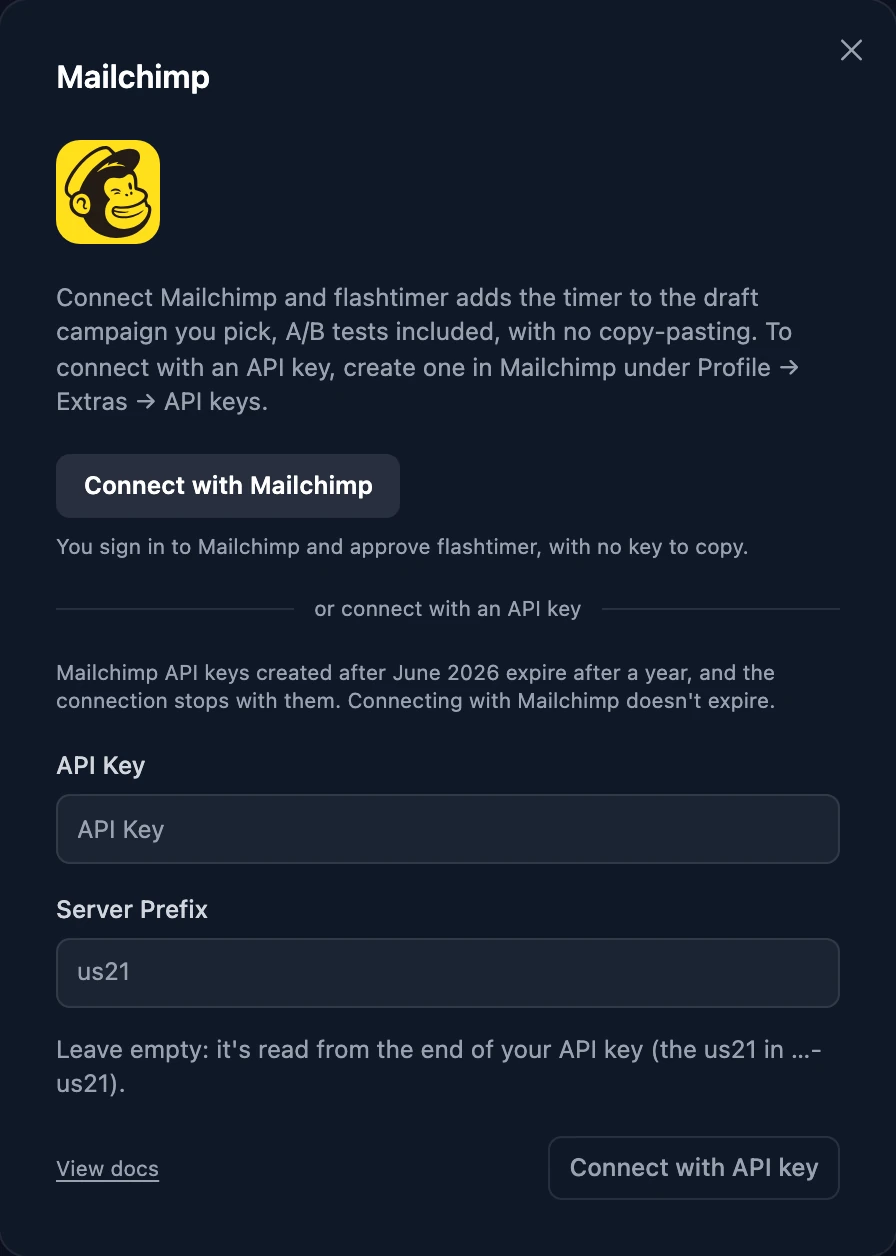
- In flashtimer
Step 3: Back in flashtimer: connected
The dialog shows Connected and names your Mailchimp account: Connected to your account, you approved flashtimer in Mailchimp. From now on, Send to ESP on a timer lists your Mailchimp draft campaigns.
The connection doesn't expire. flashtimer changes only the campaign you pick in Send to ESP, after you've seen where the timer goes, and reads it back to check Mailchimp kept it.
app.flashtimer.com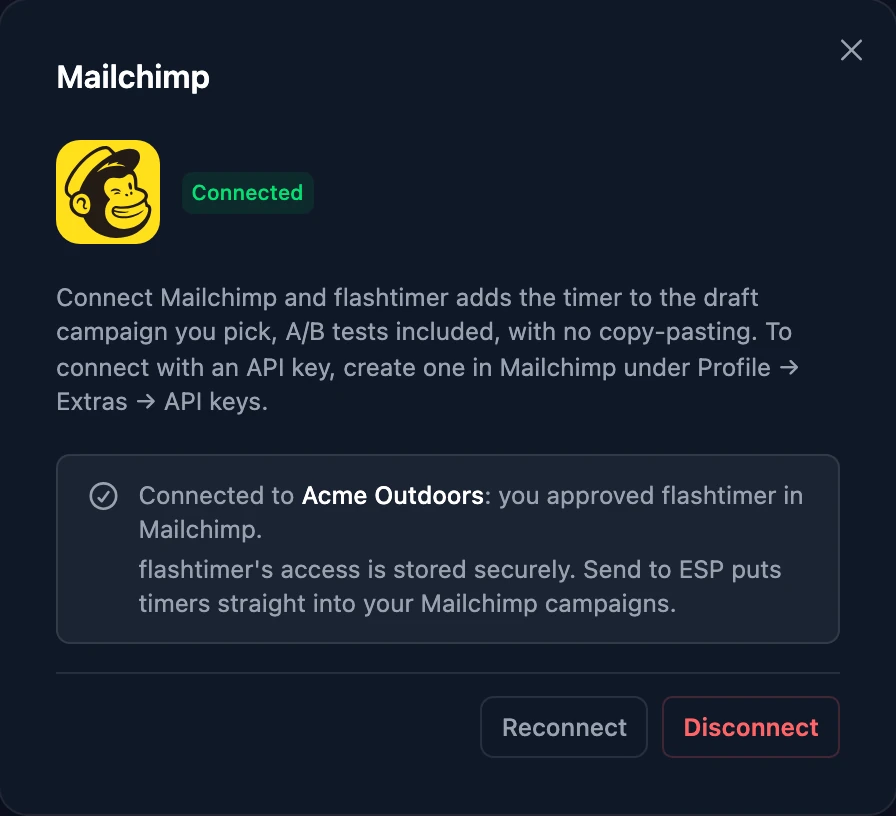
- In MailchimpOnly if you'd rather use an API key
Step 4: Or connect with an API key
In Mailchimp, open Profile → Extras → API keys and click Create A Key. Copy the key.
In flashtimer's Mailchimp dialog, paste it into API Key, leave Server Prefix empty (flashtimer reads it from the end of the key, the us21 in …-us21) and click Connect with API key. flashtimer checks the key with Mailchimp before it saves it. Mailchimp API keys created after June 2026 expire after a year, and the connection stops with them, which is why the sign-in is the one to prefer.
Once connected
What you can do next
Put a timer into a draft campaign
Pro and upOpen a timer, click Send to ESP and choose Mailchimp. Pick a draft campaign, click where the timer goes in the preview and confirm. flashtimer writes the timer in and reads the campaign back to check Mailchimp kept it. A campaign made in Mailchimp's drag-and-drop editor is saved as custom HTML, so its layout can't be edited there afterwards: the list and the preview say so before you confirm. Mailchimp sends custom HTML on its Standard and Premium plans only, so on Mailchimp's Free plan a drag-and-drop campaign is refused before anything changes, with the code to paste instead, and on a paid plan without them flashtimer warns first. Next to ✓ Embedded, Send me a test has Mailchimp email it to you, and Open goes to the campaign in Mailchimp.
Put a timer into an A/B test
Pro and upDraft A/B tests are listed too, marked (A/B test). In a test of content, the timer goes into every version at the same place; if the versions aren't laid out alike it goes into none, and you paste it yourself. A test of subject lines has one email and takes the timer like any campaign. Mailchimp doesn't send a test of an A/B test on request, so Send me a test isn't offered for those.
Give each contact their own countdown
Basic and upUse an Evergreen timer: flashtimer adds
vid=*|UNIQID|*to its URL, Mailchimp's unique ID for each contact, so each one's countdown starts at their own first open and the email address never sits in the image URL. flashtimer hashes the value before it stores it.Count down to a date each contact has
Pro and upA dynamic timer counts down to a date stored on the contact, such as a renewal or a trial end. In Send to ESP, pick the audience's date field and whether its dates are written month first or day first, and flashtimer puts the field's merge tag in the URL. Birthday fields aren't listed, because they have no year. A contact with no date, or one that has passed, sees the expired frame, never a wrong countdown.
See how each campaign did
Pro and upAfter a campaign goes out, the timer page's Results in Mailchimp panel shows Mailchimp's own numbers for it: how many it was sent to, and the share that opened and clicked.
Preview and send a test
Every planIn Mailchimp, preview the campaign and send a test to a Gmail and an Outlook address. Check that the timer shows the time left right now and, for an evergreen or dynamic timer, that the tag in the image address filled in. Then send or schedule the campaign.
Paste it in yourself
Every planClick Embed on a timer, choose Mailchimp as the email platform and copy the HTML. In Mailchimp's email builder, add a Code block and paste it. This works on every flashtimer and Mailchimp plan, in Customer Journeys too. The Mailchimp countdown timer guide covers it step by step.
Manage
Manage the connection
- Move or take out a timer
- Send the timer to the same campaign again and the new one replaces the old one. On the timer page, Embedded in lists the Mailchimp campaigns the timer is in, and you can remove it from one there, from every version of an A/B test at once.
- Disconnect
- In Settings → Integrations → Mailchimp, click Disconnect. Timers already in your campaigns keep counting down, since flashtimer serves the image. If you connected with a key, delete it under Profile → Extras → API keys in Mailchimp too.
- Reconnect or replace the key
- A connection made with Connect with Mailchimp offers Reconnect: log in to Mailchimp again. One made with a key offers Update key: paste a new key from Mailchimp, then delete the old one there. If Mailchimp stops accepting the key, the card says Reconnect needed until you do.
- Use another Mailchimp account
- An organization connects one Mailchimp account at a time. Disconnect, then connect again and log in with the other account.
Troubleshooting
If something doesn't work
Most problems show a message on flashtimer's Integrations page. Here's what each one means and what to do.
- “Integrations require the Pro plan or higher.”
- Connecting Mailchimp is on Pro and up. Upgrade under Settings → Billing, or paste the timer's HTML into a Code block yourself, which works on every plan.
- “Only owners and admins can change this connection.”
- Connecting Mailchimp is up to your organization's owners and admins. Ask one of them to connect it, or to make you an admin.
- “Mailchimp wasn't connected: flashtimer's access wasn't approved.”
- Mailchimp's page was closed or the authorization declined before it finished. Click Connect with Mailchimp again and log in.
- “This connection was started in another browser, or has expired. Please try again.”
- Finish logging in to Mailchimp in the same browser you started from, within ten minutes. Click Connect with Mailchimp again to start over.
- “You started connecting Mailchimp from another organization. Switch to it and connect again.”
- You switched organizations in flashtimer while Mailchimp's page was open. Switch back to the organization you want Mailchimp in, then connect again.
- Mailchimp didn't accept the API key
- Check that you pasted the whole key and that it's still listed under Profile → Extras → API keys in Mailchimp. Keys created after June 2026 expire after a year. Or skip the key and use Connect with Mailchimp.
- “Your Mailchimp plan can't send this email once the timer is in.”
- The campaign was made in Mailchimp's drag-and-drop editor, and adding the timer would save it as custom HTML, which Mailchimp's Free plan can't send. Paste the timer's HTML into a Code block in that campaign instead, or use a campaign coded in custom HTML already.
- My campaign isn't in Send to ESP
- Send to ESP lists draft campaigns, regular ones and A/B tests. Unschedule a scheduled campaign in Mailchimp to bring it back to draft; replicate a sent one. Plain-text and RSS campaigns aren't listed, since the timer is an image in the email's HTML, and neither are Customer Journey emails: paste the timer into those yourself. Search by the campaign's name.
- Every contact sees the same countdown
- The timer isn't evergreen, or its address lost Mailchimp's tag. Make it Evergreen in flashtimer and check that the image address ends in
vid=*|UNIQID|*, then send the timer to the campaign again. - The timer doesn't move in Outlook
- Classic Outlook for Windows (2007–2019, and newer versions with Windows animations turned off) shows only the first frame of a GIF. flashtimer makes that frame the correct time left at the moment of opening; it just doesn't tick. Restate the deadline in text, like "ends Sunday at midnight".
Still stuck? Contact support.
Questions
Answered before you ask.
Keep reading
- Mailchimp integrationMailchimp countdown timer that stays live in every inboxAdd a live Mailchimp countdown timer with a Code block, evergreen deadlines per subscriber via *|UNIQID|*, and Customer Journeys support. Start free today.
- Evergreen timersEvergreen countdown timer for email: a personal deadline for every readerGive every reader their own deadline with an evergreen countdown timer email: starts on open or on send, built for flows. Set up in minutes. Start free.
- A/B testsCountdown timer A/B test: find the design your readers act onRun a countdown timer A/B test from one image URL: split readers between two designs, compare views, clicks and CTR, then make the winner permanent.