Before you start
What you need
Owner or admin in flashtimer
Connecting an integration is up to your organization's owners and admins.
A Shopify login that can install apps
The store owner's login works. A staff login works if it is allowed to manage and install apps.
Any flashtimer plan
Connecting is free. Discounts become timers on Pro and up, and Stock Monitor is on Business.
Video
Watch the setup
The whole connection in 53 seconds, start to finish. The steps below go through the same screens one at a time.
Step by step
Connect Shopify
You start in flashtimer, approve flashtimer in Shopify and land back in flashtimer. There is nothing to copy between the two.
- In ShopifyWhile Shopify reviews flashtimer's app
Step 1: Check that your store can install the app yet
flashtimer's app is in review for the Shopify App Store. Until the review is done, Shopify lets it be installed on development stores only: on a live store, Shopify stops at step 3.
If your store already has a custom app it would rather use, contact us and we'll help you connect it.
- In flashtimer
Step 2: In flashtimer, open Integrations and click Shopify
In flashtimer, go to Settings → Integrations, open the E-commerce tab and click Shopify.
The dialog asks for one thing: your store's address.
app.flashtimer.com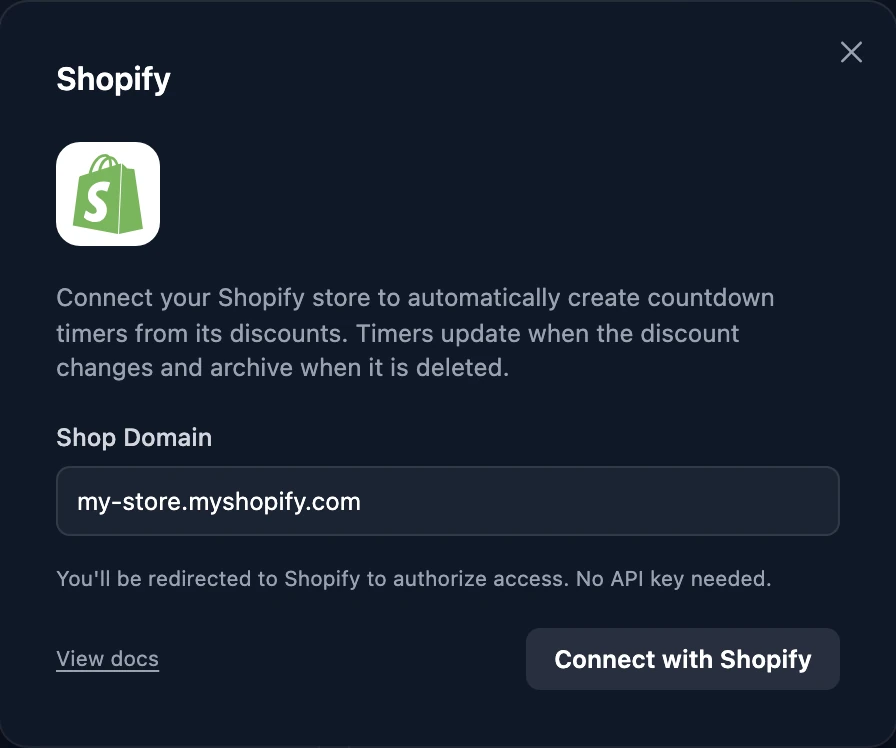
- In flashtimer
Step 3: Type your store's myshopify.com address and click Connect with Shopify
In Shop Domain, type the address Shopify gave your store when you opened it, which ends in .myshopify.com, like
my-store.myshopify.com. Not your shop's own domain. You'll find it in your Shopify admin under Settings → Domains.Click Connect with Shopify. Shopify opens in the same tab; if you aren't signed in to Shopify in this browser, it asks you to sign in first.
- In Shopify
Step 4: In Shopify, check the access and click Install
Shopify shows an Install app page that names flashtimer and lists what it needs: View store data (products, discounts, rollouts) and View staff and contributor data, limited to Store owner. Nothing on the list is about your customers, orders or checkouts, and none of it lets flashtimer change your store.
Click Install. Shopify sends you back to flashtimer.
What flashtimer does with each permission
- Discounts, Rollouts
- Reads your discounts and their end dates, to make timers from them and keep each timer on its discount's date. Rollouts tells flashtimer which discounts a Shopify rollout is serving.
- Products
- Lists your products in Stock Monitor and reads their stock levels, so a timer can end when its product runs low.
All of it is read-only: flashtimer never changes a discount, a product or a stock level, and never sees your customers, orders or checkouts. Shopify lists these under **View store data** on its Install app page.
- In flashtimer
Step 5: Connected: choose what flashtimer does by itself
The dialog shows Connected and your store's address. Shopify now tells flashtimer whenever a discount is added, changed or deleted, so a change reaches your timers within seconds.
Under Automation, all three choices start ticked. Auto-create timers makes a timer for each discount with an end date, Auto-update timers moves a timer's end when you change that date, and Auto-archive timers puts a timer away when the discount is deleted. Untick what you'd rather do yourself: your choice is saved as you make it.
That's the connection done: nothing to paste, and no key to keep safe.
app.flashtimer.com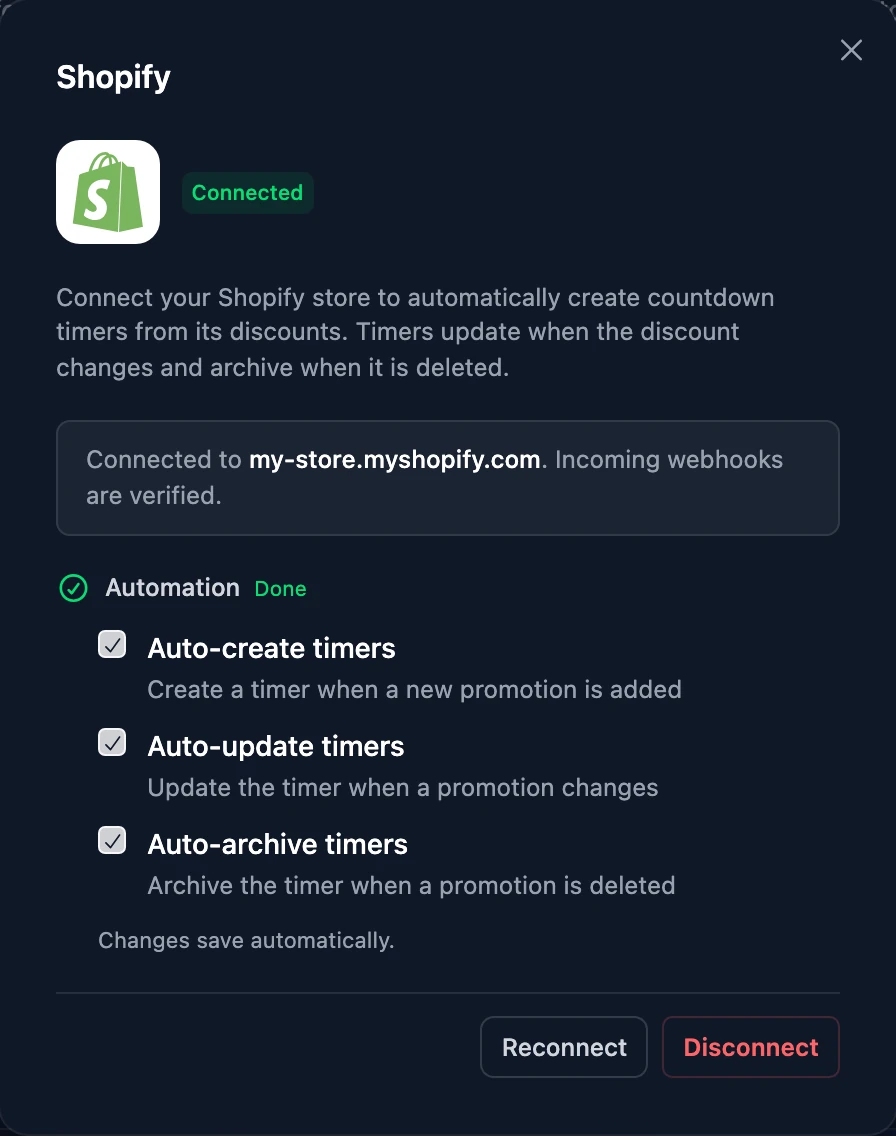
Once connected
What you can do next
Make a timer from a discount
Pro and upOn the Timers page, open the arrow next to New timer and under Import choose Shopify. Pick a discount with an end date and click Create timer: it counts down to that date. A timer you make this way tells you when the date changes and offers to Sync.
Let new discounts become timers by themselves
Pro and upWith Auto-create timers on, a new discount with an end date gets a timer within seconds, ready to drop into any email.
End a timer when a product runs low
BusinessOpen a timer, go to Automations and add a Stock Monitor: pick a product and the stock level at which the timer should end, so you never count down to stock you no longer have.
Manage
Manage the connection
- Disconnect
- In Settings → Integrations → Shopify, click Disconnect. Your timers stop following Shopify's discounts and stock, and they keep the end dates they have now. Timers already in your emails keep showing and counting down.
- Reconnect
- Reconnect, next to Disconnect, sends you through Shopify's approval once more. Use it when a new feature needs a permission you haven't approved yet, or when flashtimer says Shopify stopped accepting the connection.
- Remove the app in Shopify
- Uninstalling flashtimer under Settings → Apps in your Shopify admin disconnects the store in flashtimer too.
- Move it to another organization
- A store is connected to one flashtimer organization at a time. Connect it from another of your organizations and flashtimer asks before moving it there.
Troubleshooting
If something doesn't work
Most problems show a message on flashtimer's Integrations page. Here's what each one means and what to do.
- “Invalid shop domain.”
- Shop Domain takes the address that ends in .myshopify.com, without
https://in front and without anything after it. Your shop's own domain, likemy-store.com, isn't accepted. - “This connection was started in another browser, or has expired. Please try again.”
- Finish in the browser you started in, without a long pause on Shopify's screen. Start again from Settings → Integrations.
- “You started connecting this store from another organization. Switch to it and connect again.”
- You switched organizations in flashtimer while Shopify was open. Switch back to the one you started in, or connect again from the one you're in now.
- “Shopify didn't grant every permission flashtimer asked for. Connect again and approve them all.”
- flashtimer connects only when Shopify grants the whole list. Click Connect with Shopify again and approve it as it is.
- “Session expired. Press Reconnect on the Shopify card to try again.”
- Too long passed between the two halves of a reconnect. Open the Shopify dialog and click Reconnect once more.
- Shopify won't let me install the app
- While the app is in review for the Shopify App Store, Shopify installs it on development stores only. Contact us and we'll tell you when it's listed, or help you connect a custom app your store already has.
Still stuck? Contact support.
Questions
Answered before you ask.
Keep reading
- Shopify integrationShopify email countdown timer for your sales and discountsAdd a live Shopify email countdown timer to Shopify Messaging campaigns, and turn Shopify discounts into timers that update themselves. Start free today.
- IntegrationsWorks with 40+ email, e-commerce and automation platformsKlaviyo, Mailchimp, Shopify, HubSpot and every ESP that shows images.
- DevelopersCountdown timer API & MCP serverCreate and embed timers from code, Claude, ChatGPT, Gemini or Grok.