Before you start
What you need
Owner or admin in flashtimer
Connecting an integration is up to your organization's owners and admins, on Pro and up.
An admin login to your store
One that can open System → Integrations and Stores → Configuration. If you don't see those menus, ask whoever manages the store.
Magento 2.4 or Adobe Commerce
Magento Open Source and Adobe Commerce, on your own servers or on Adobe's cloud. Adobe Commerce as a Cloud Service connects another way, described here.
Step by step
Connect Adobe Commerce
First you make a key for flashtimer in your store's admin (steps 1 to 7), then you paste it into flashtimer (steps 8 and 9). The last two steps are an optional extra that makes changes arrive at once, and need someone who can install a module.
- In Adobe Commerce
Step 1: In your store's admin, open System → Integrations
Sign in to your store's admin. In the menu on the left click System, and under Extensions click Integrations.
An integration is your store's way of giving another service a key of its own, with only the access you choose. Click Add New Integration.
your-store.com/admin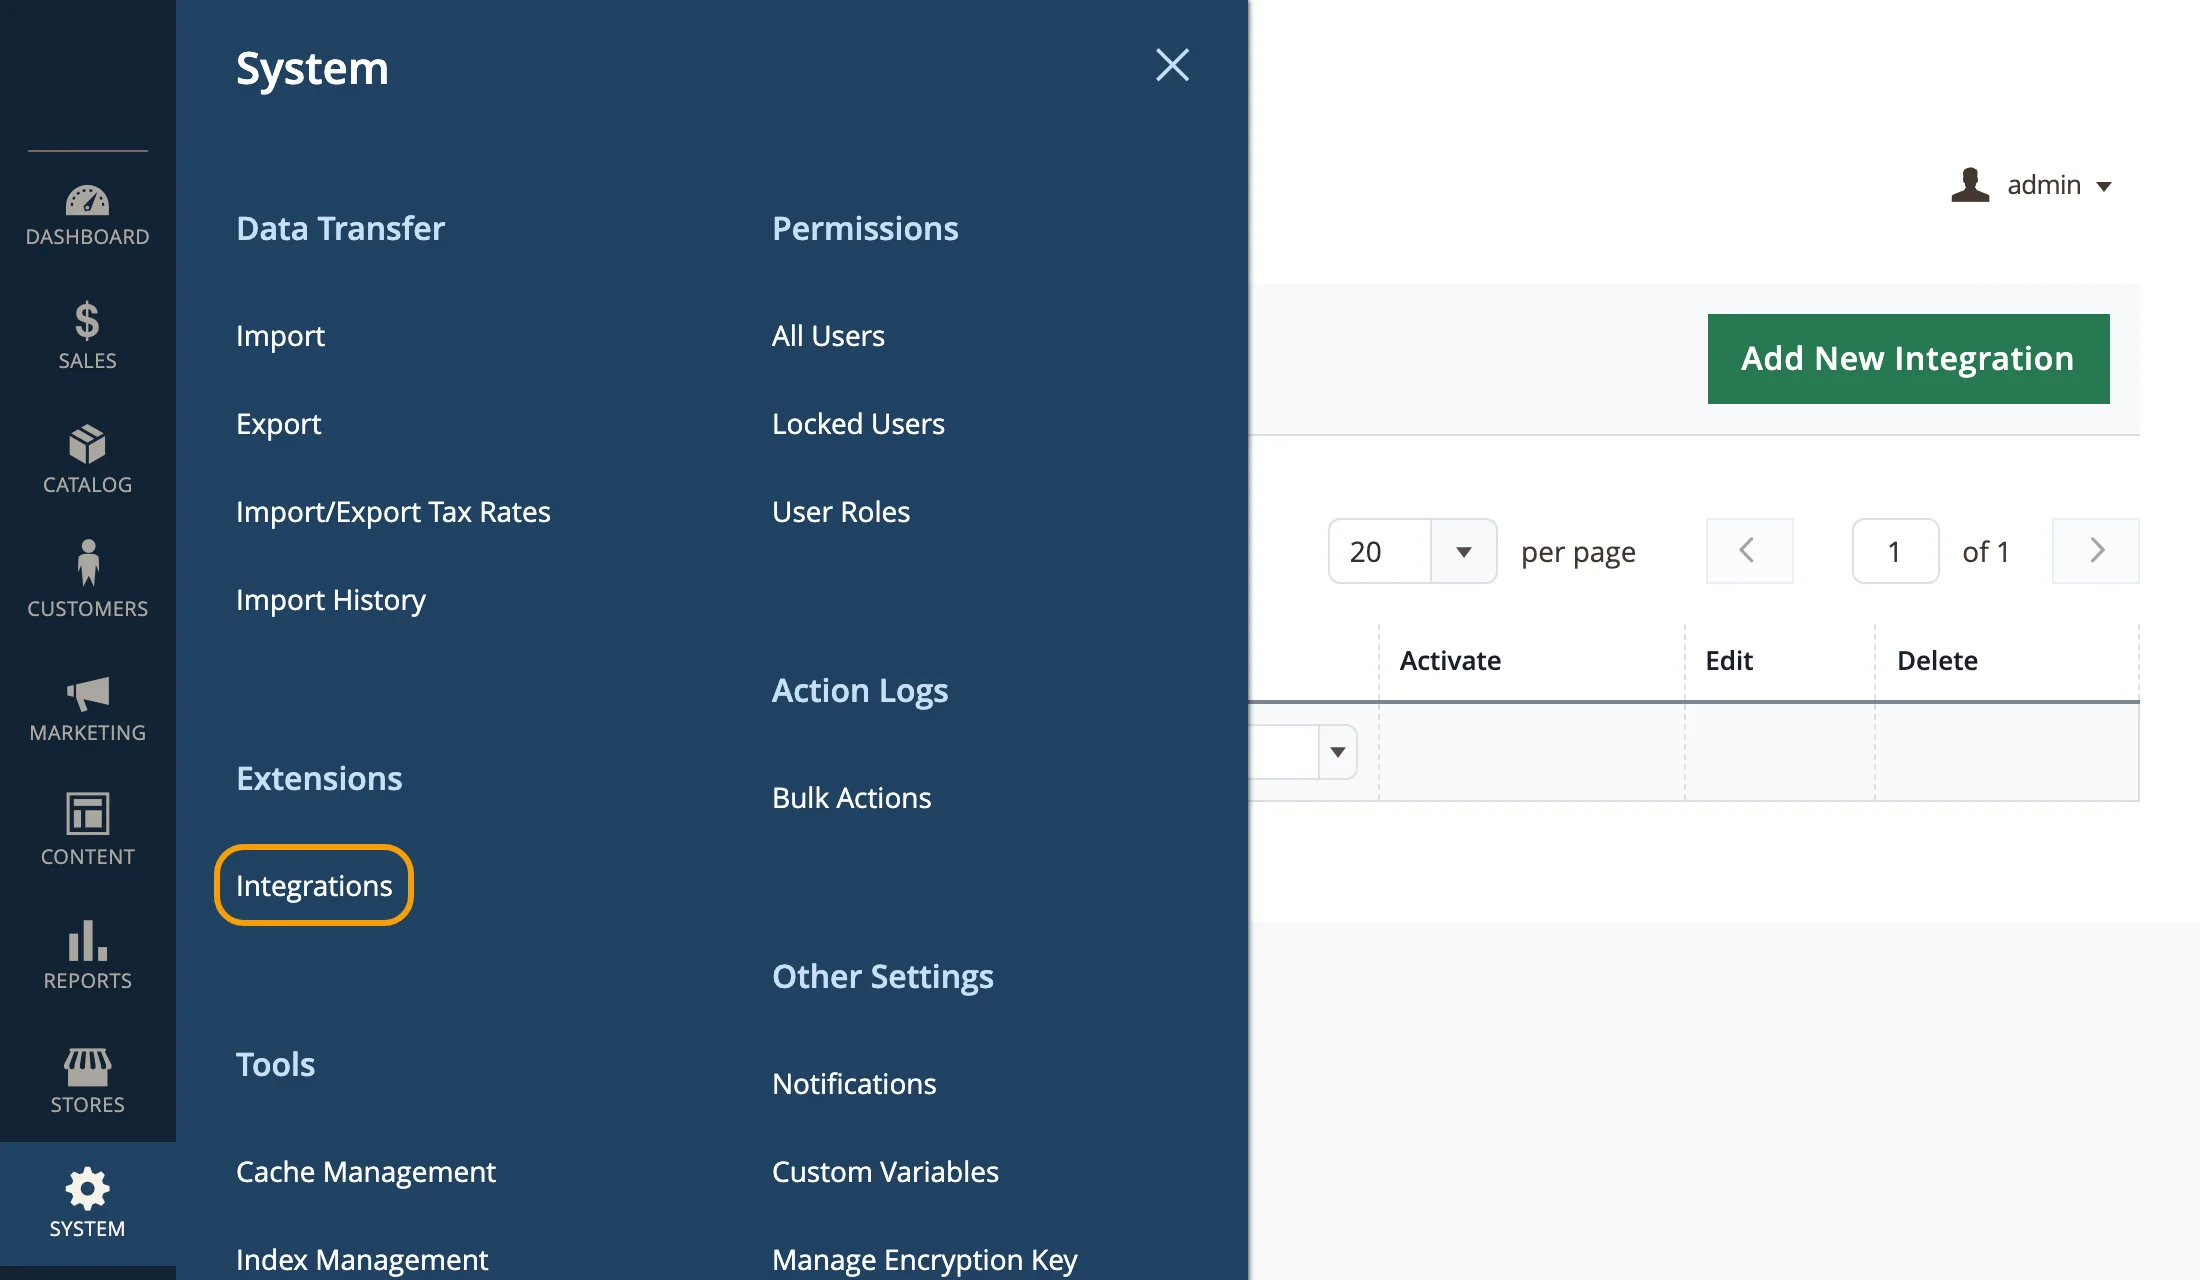
- In Adobe Commerce
Step 2: Name it flashtimer and enter your admin password
In Name, type flashtimer. Leave Email, Callback URL and Identity link URL empty.
Under Current User Identity Verification, type the password you sign in to this admin with. Your store asks for it whenever access is handed out. Don't click Save yet.
your-store.com/admin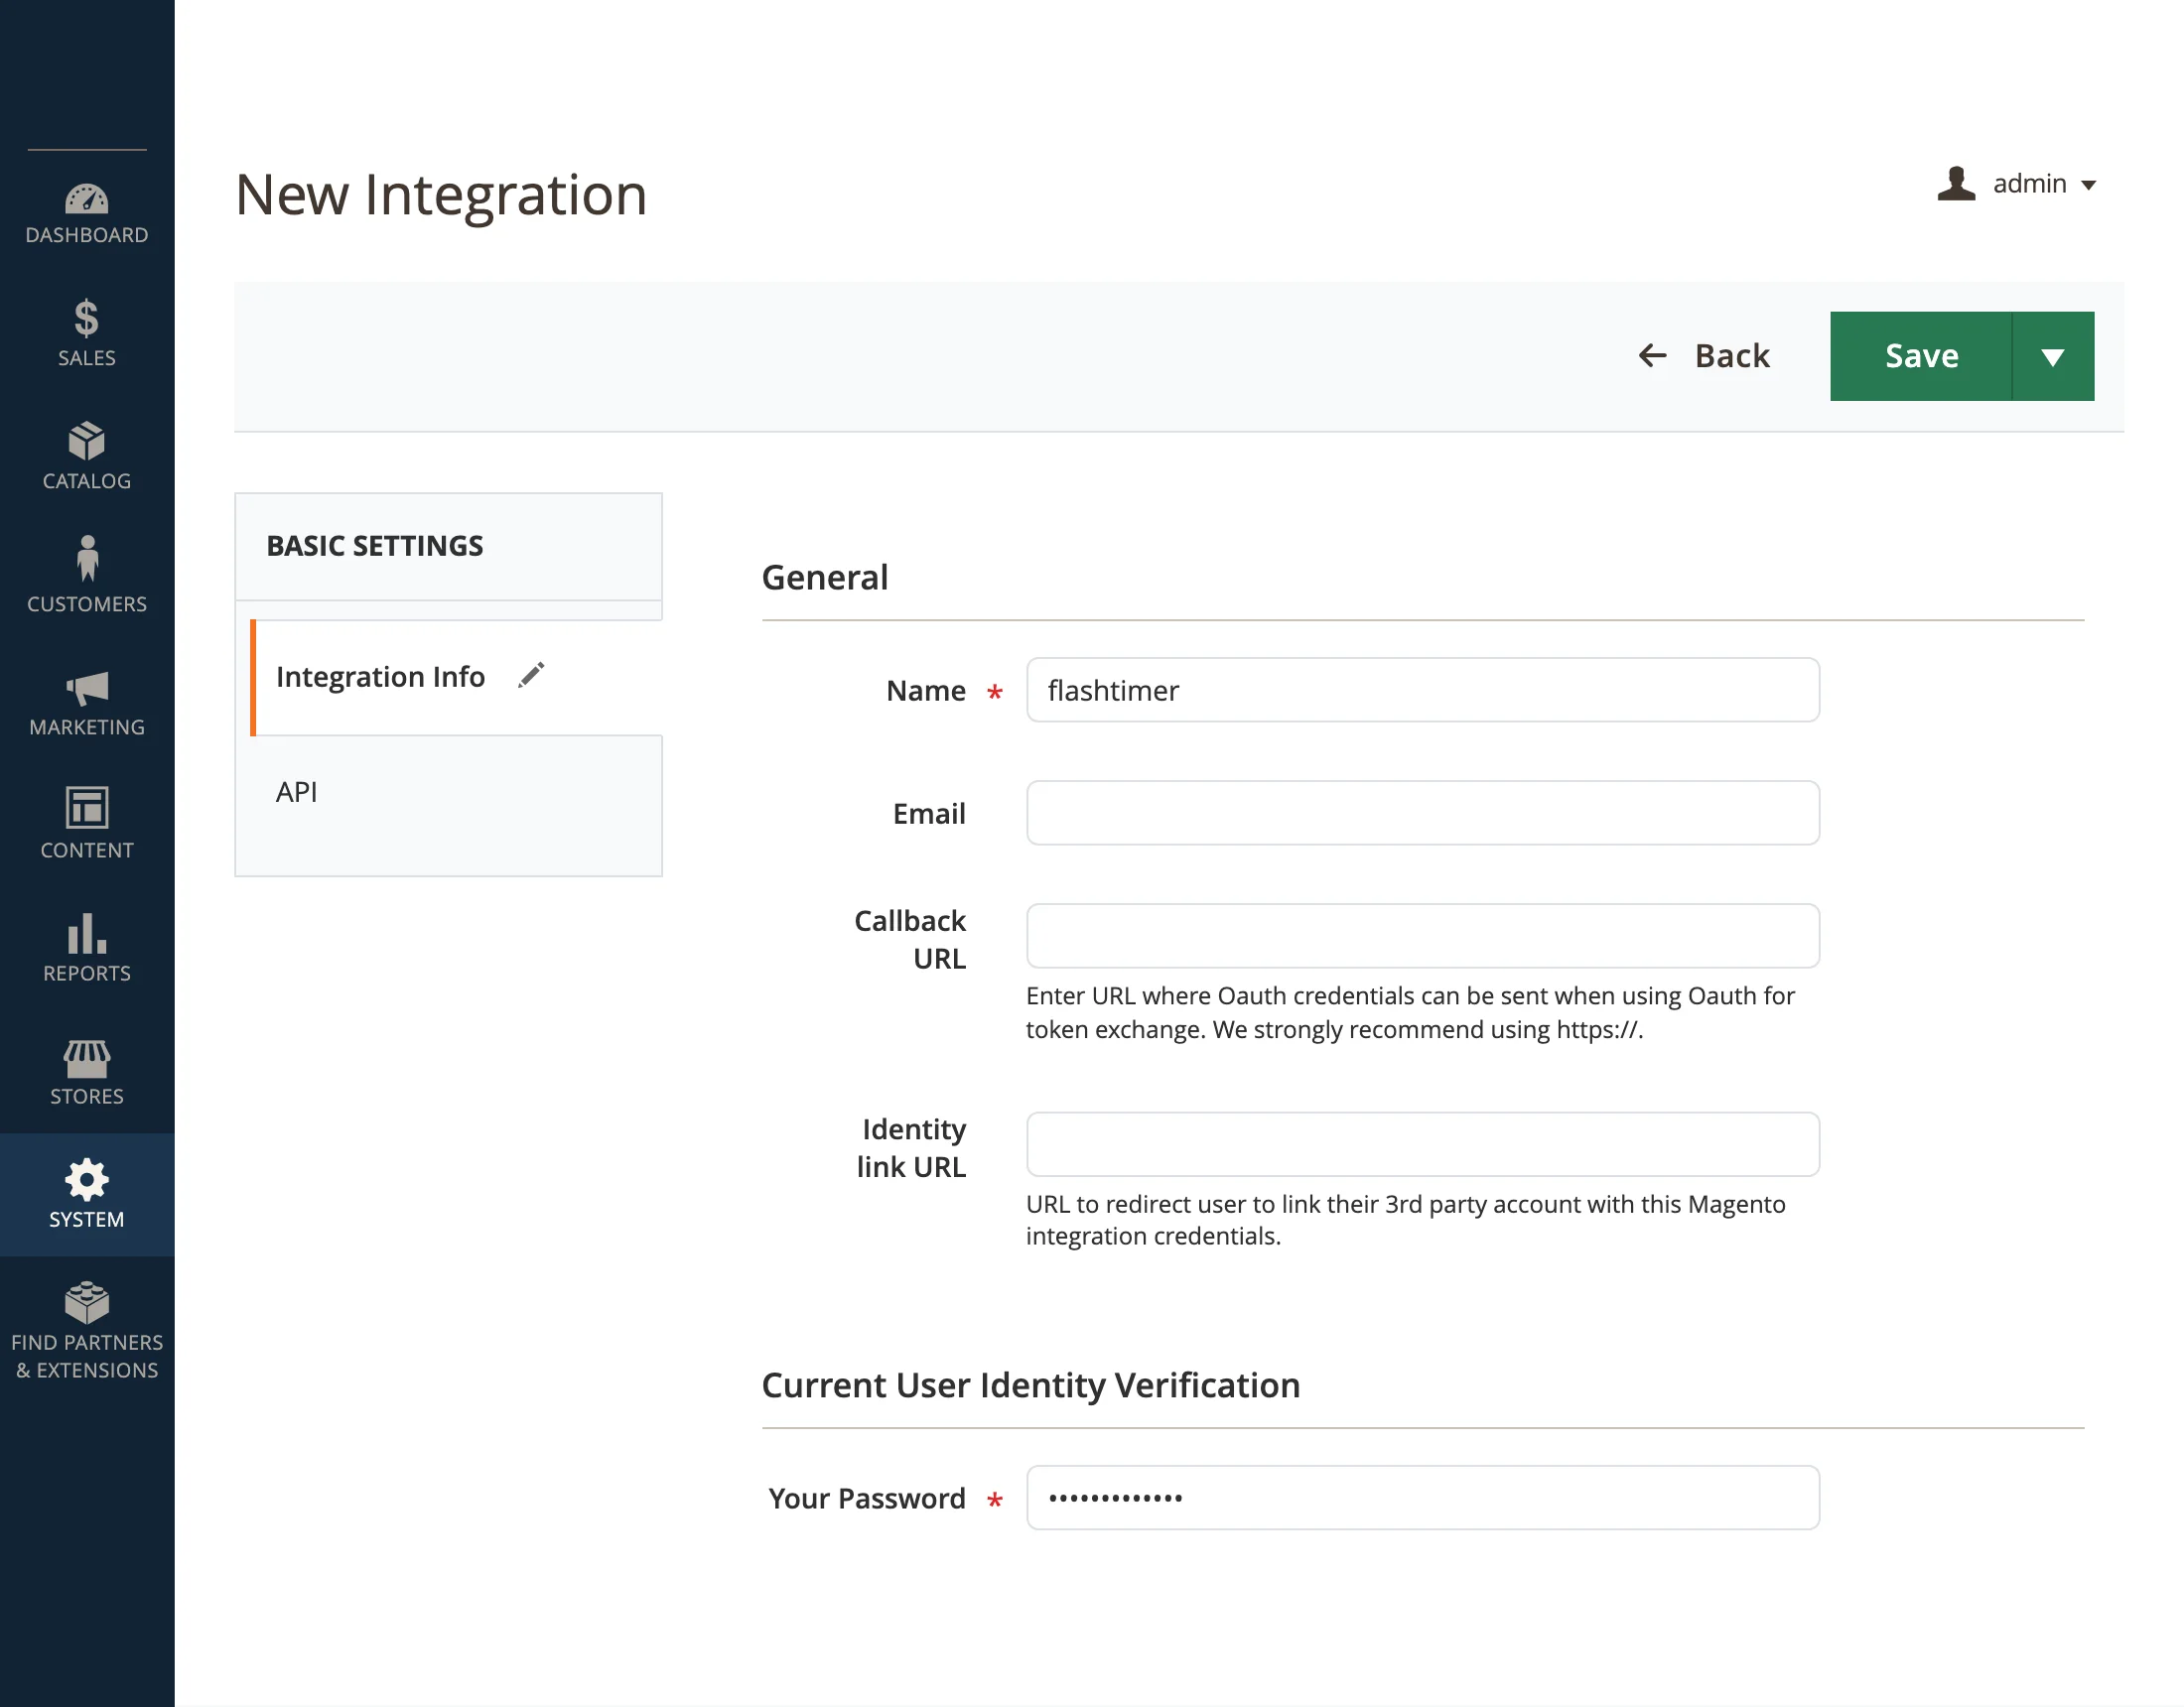
- In Adobe Commerce
Step 3: On the API tab, tick what flashtimer may read
Click API on the left. Set Resource Access to Custom, then tick these five boxes: Catalog → Inventory → Products, Marketing → Promotions → Cart Price Rules, Stores → Settings → All Stores, Stores → Inventory → Sources and Stores → Inventory → Stocks. Click the small arrows to open each group.
Only want timers that follow your sales, without Stock Monitor? Cart Price Rules and All Stores are enough. Then click Save.
your-store.com/admin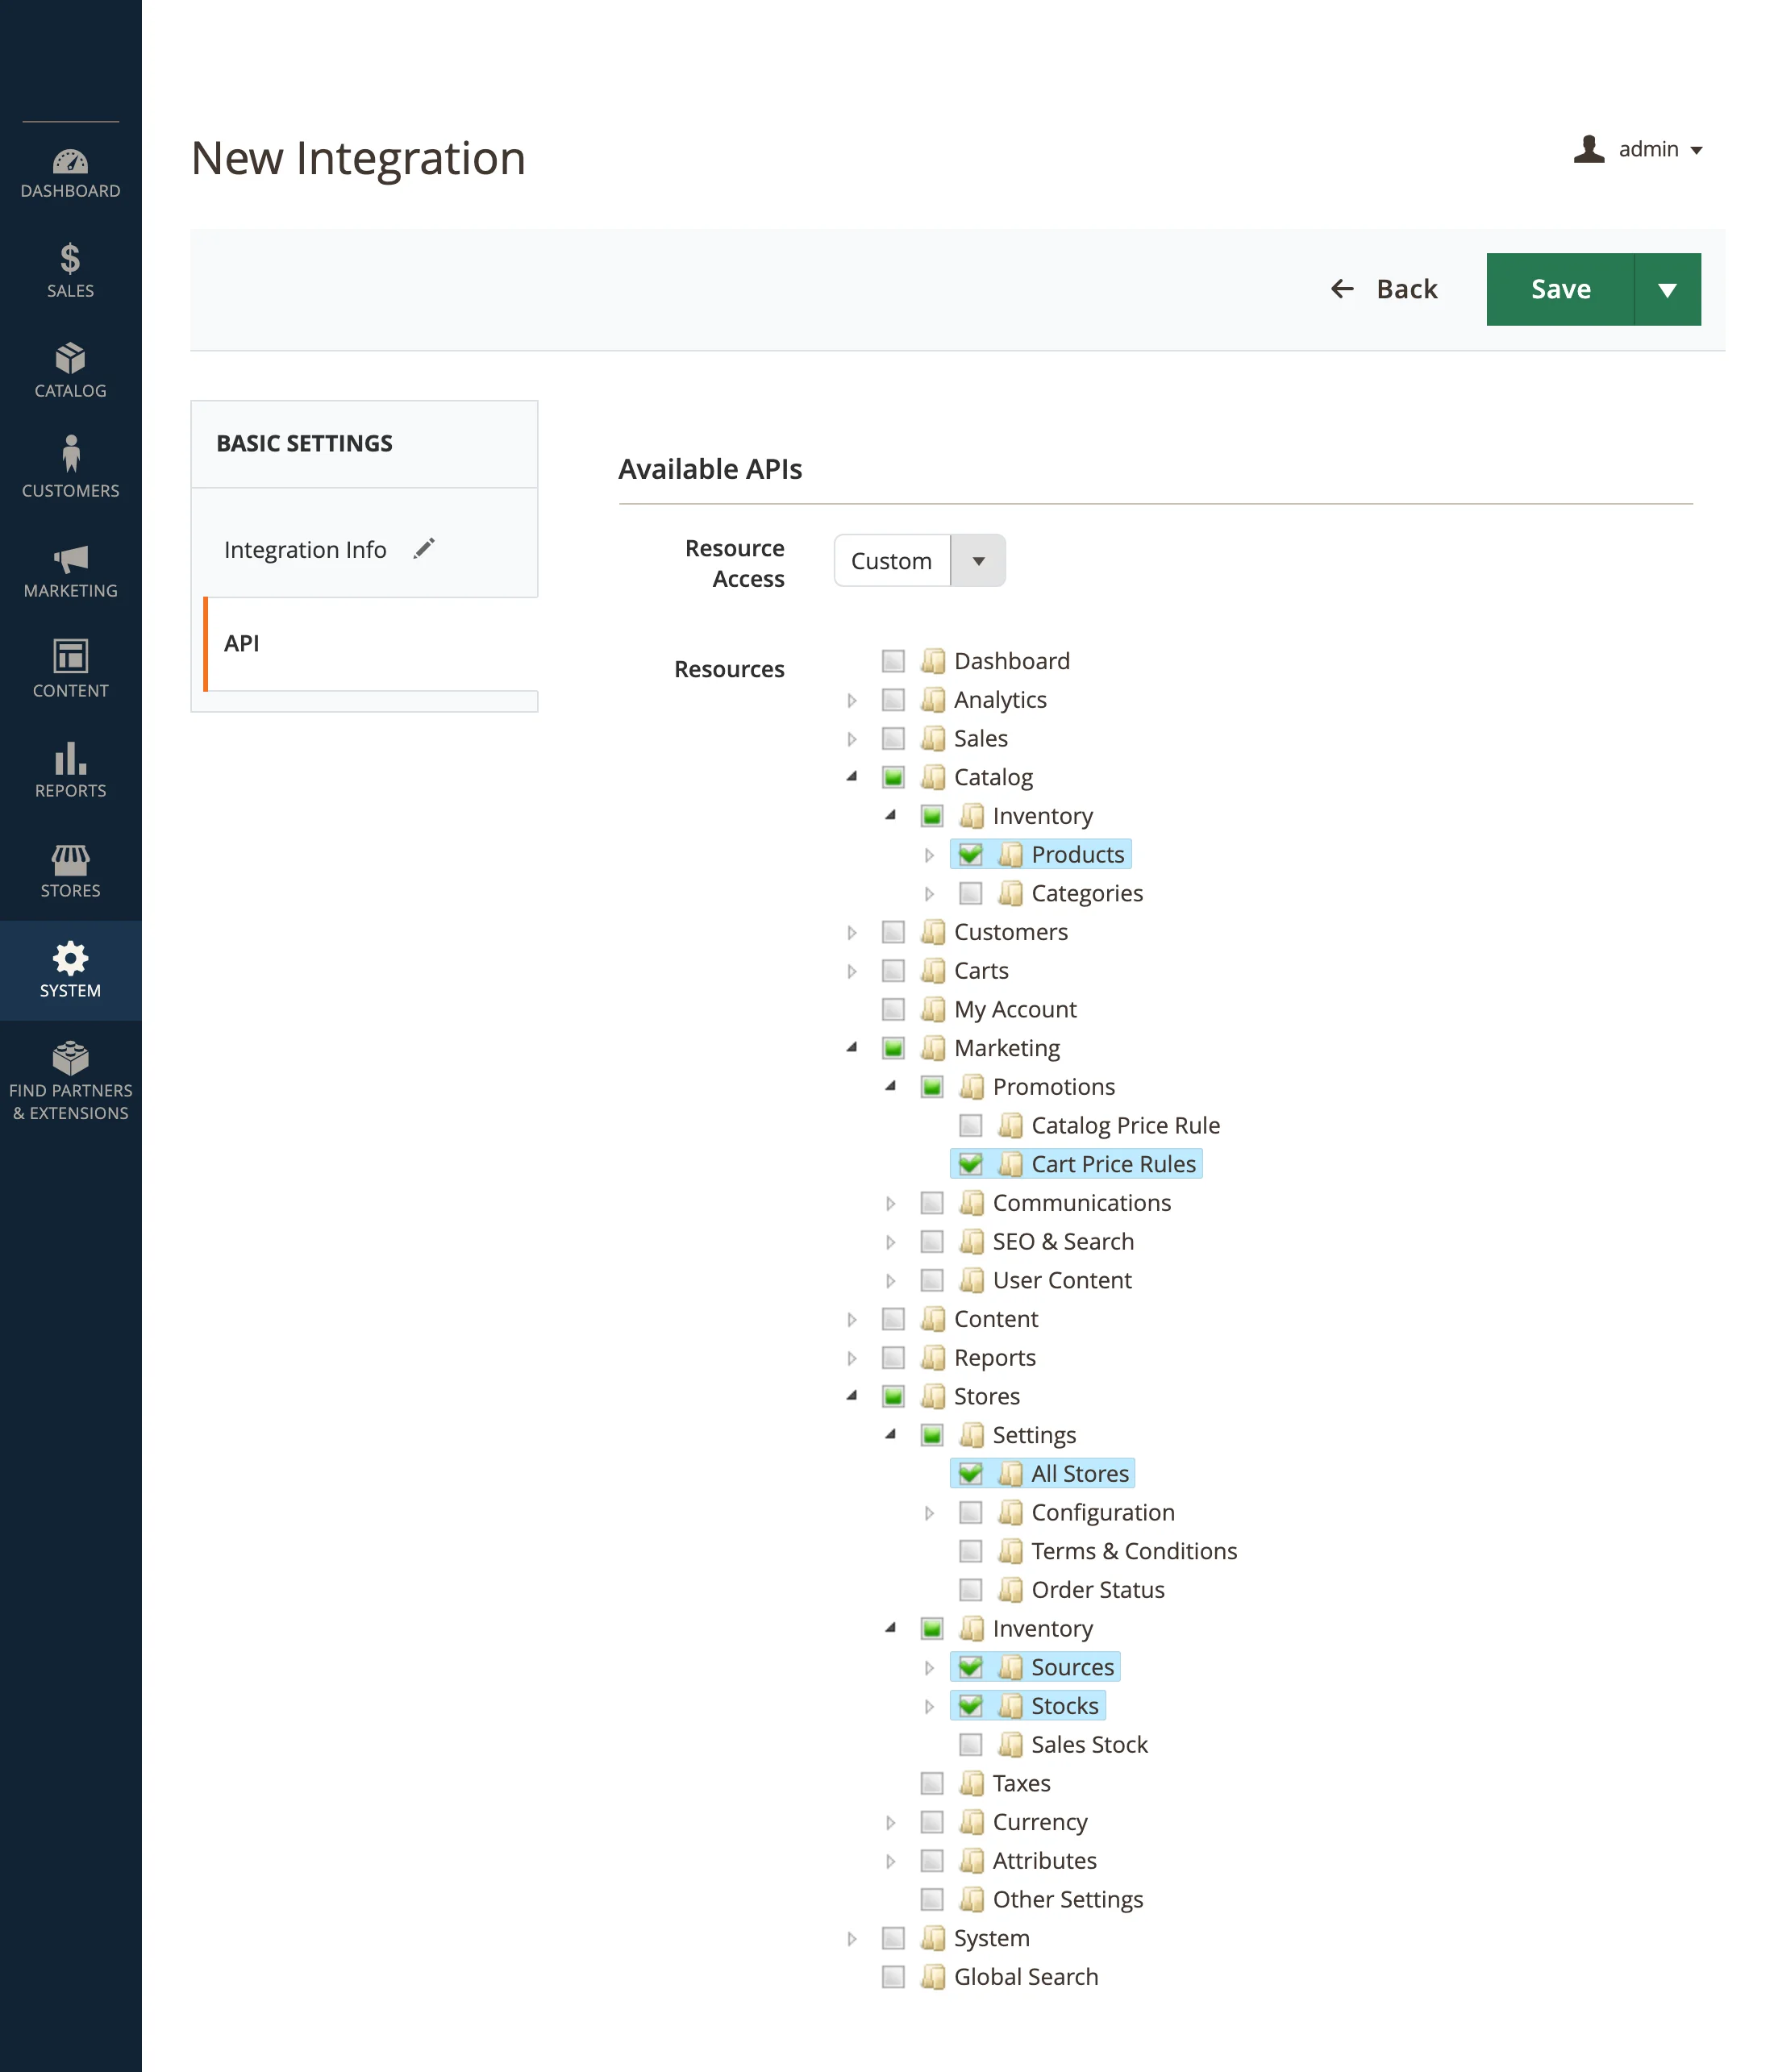
What flashtimer does with each permission
- Cart Price Rules
- Reads your cart price rules: their names, dates and whether they are active. This is what timers follow.
- All Stores
- Reads your store's time zone, so a sale that ends on the 30th ends at midnight where your store is, not somewhere else.
- Products
- Lists your products by name and SKU when you pick one for Stock Monitor.
- Sources, Stocks
- Reads how many of a product can still be bought, so Stock Monitor can end a timer when it sells out.
flashtimer only reads. It never changes a rule, a product, a price or your stock.
- In Adobe Commerce
Step 4: Click Activate on flashtimer's row
After you save, your store takes you back to the Integrations page. flashtimer is listed there as Inactive: it exists, but has no key yet.
Click Activate on its row.
your-store.com/admin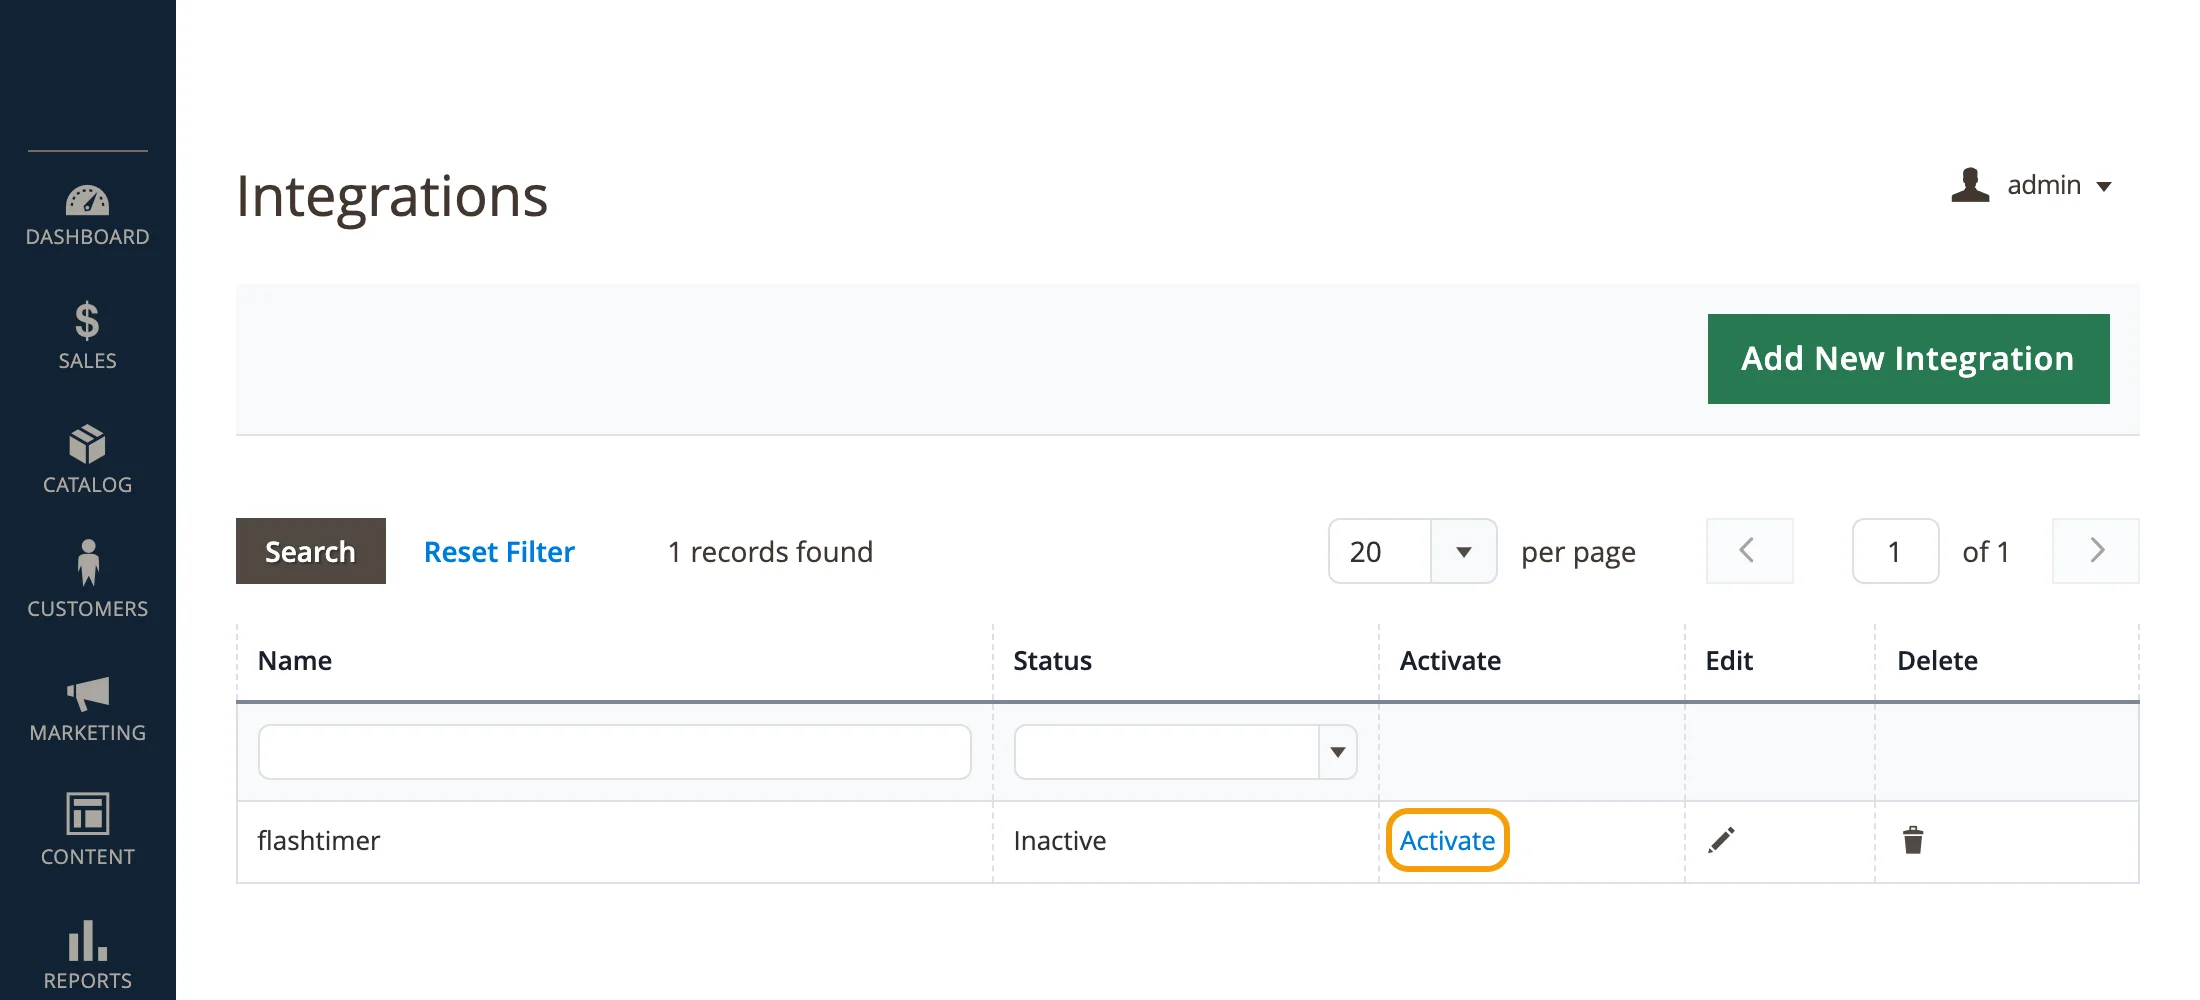
- In Adobe Commerce
Step 5: Check the access and click Allow
Your store lists the access you ticked in step 3, so you can check it once more. Groups you ticked show everything inside them.
Click Allow at the top right.
your-store.com/admin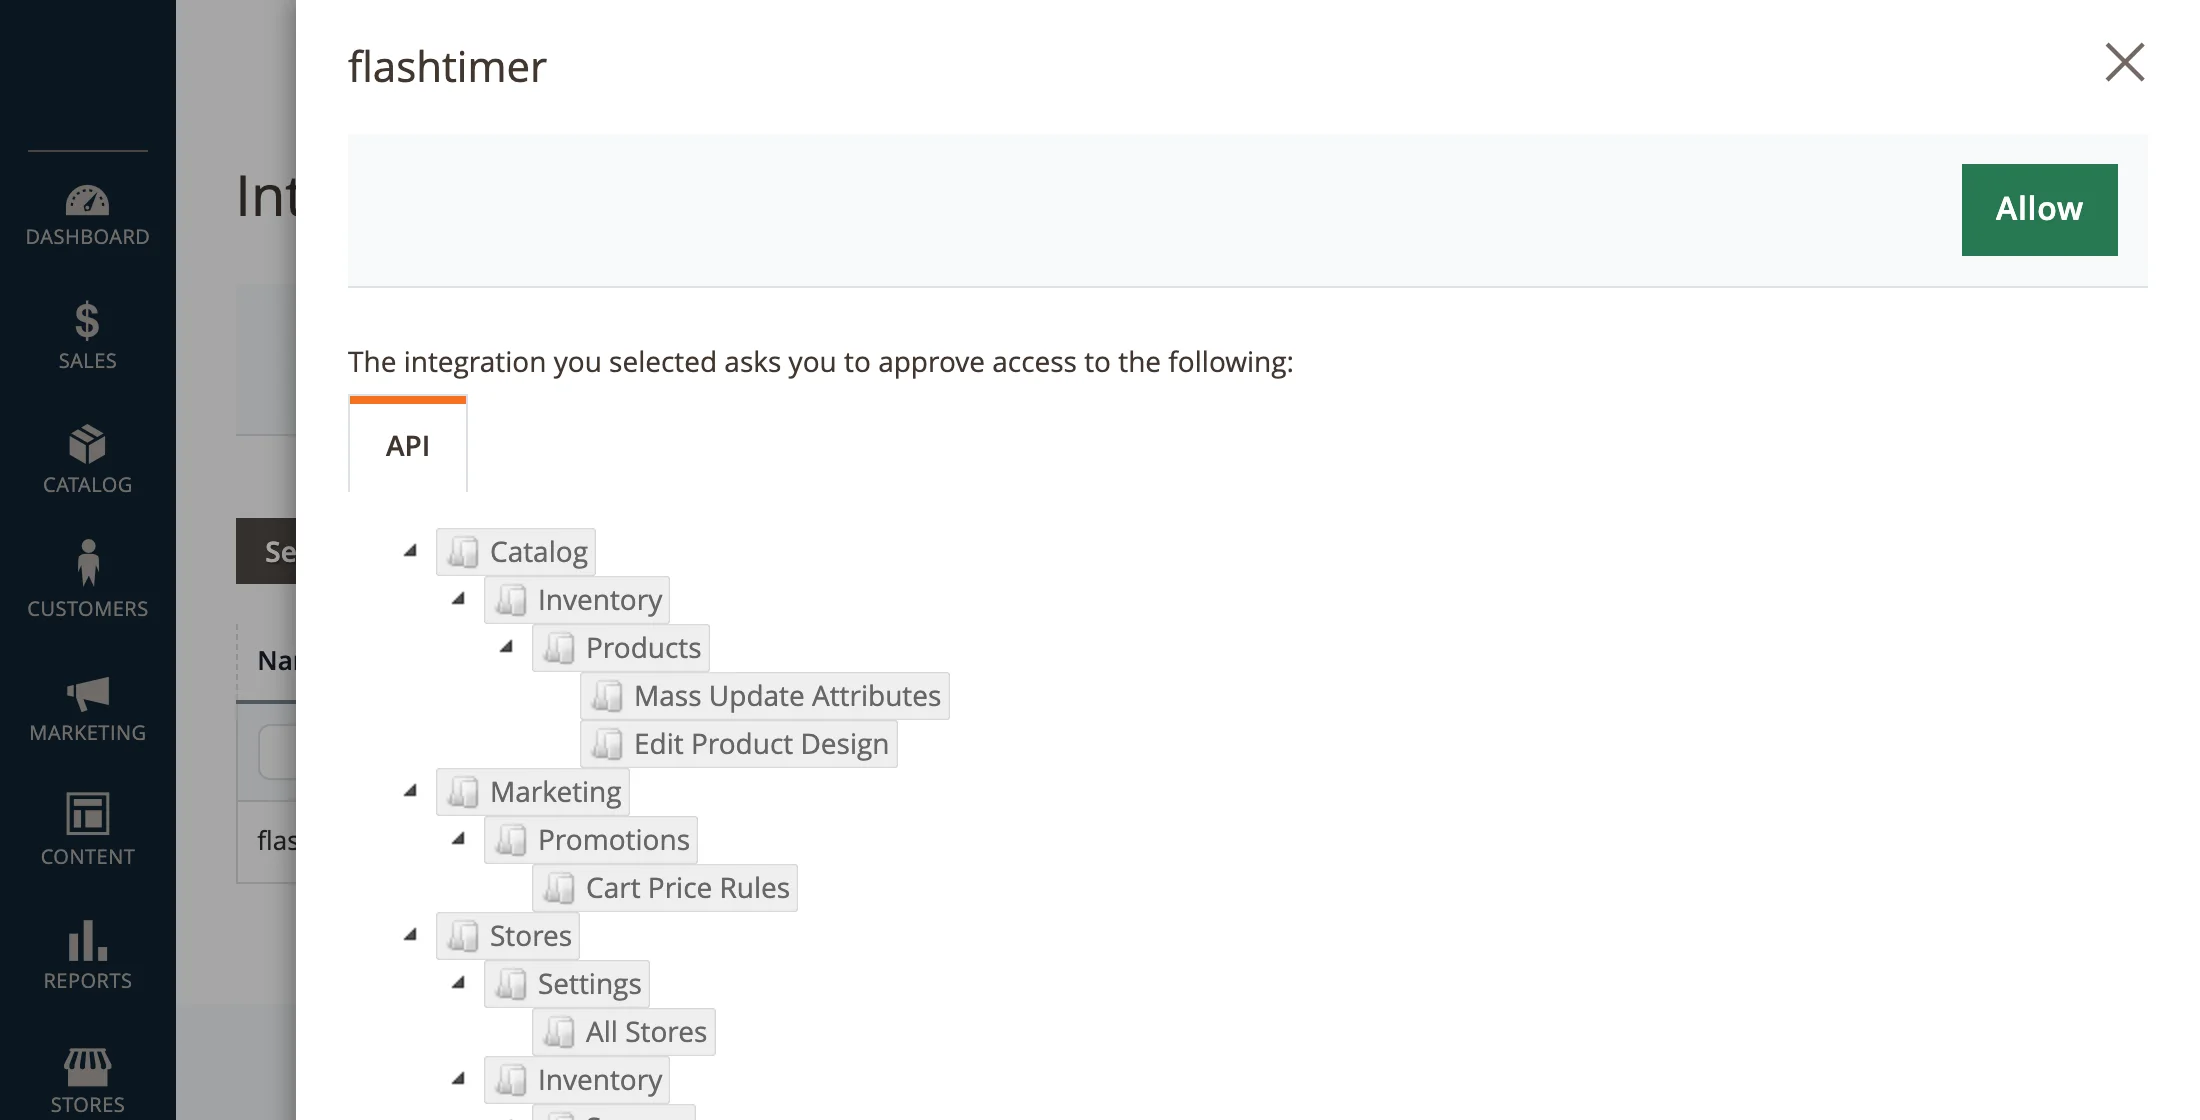
- In Adobe Commerce
Step 6: Copy the Access Token
Your store shows four values. flashtimer needs one of them: the Access Token, the third one. Copy it somewhere safe for a minute, then click Done.
Treat it like a password: anyone who has it can read what you ticked in step 3. If you lose it, click Reauthorize on the integration's row for a new one.
your-store.com/admin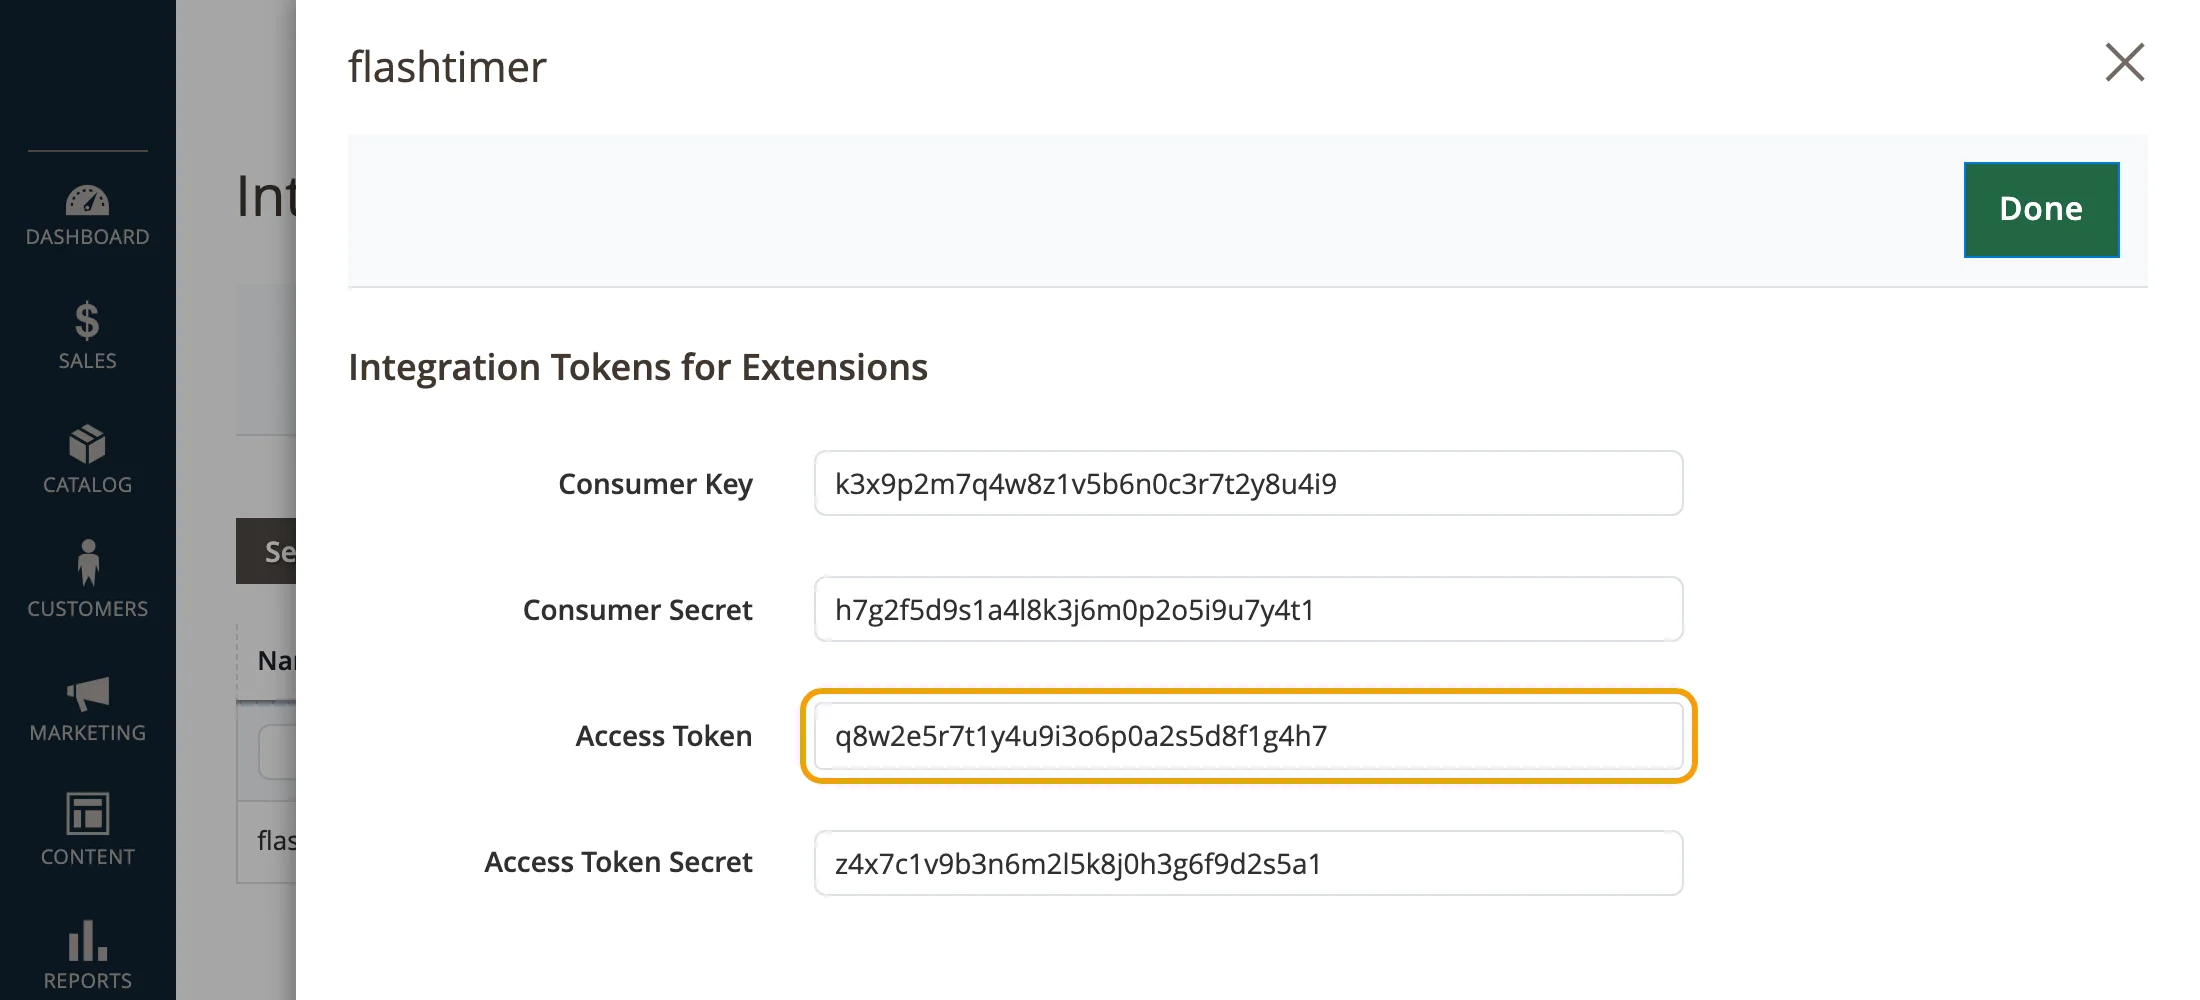
- In Adobe CommerceMagento 2.4.4 and later
Step 7: Let your store accept the token
Since version 2.4.4 a store refuses an integration's token until one setting is turned on. Go to Stores → Configuration, open Services on the left and click OAuth.
Open Consumer Settings and set Allow OAuth Access Tokens to be used as standalone Bearer tokens to Yes. If the box is grey, untick Use system value next to it first. Click Save Config.
Not sure which version you have? Do this step anyway: it's the usual reason a connection is refused.
your-store.com/admin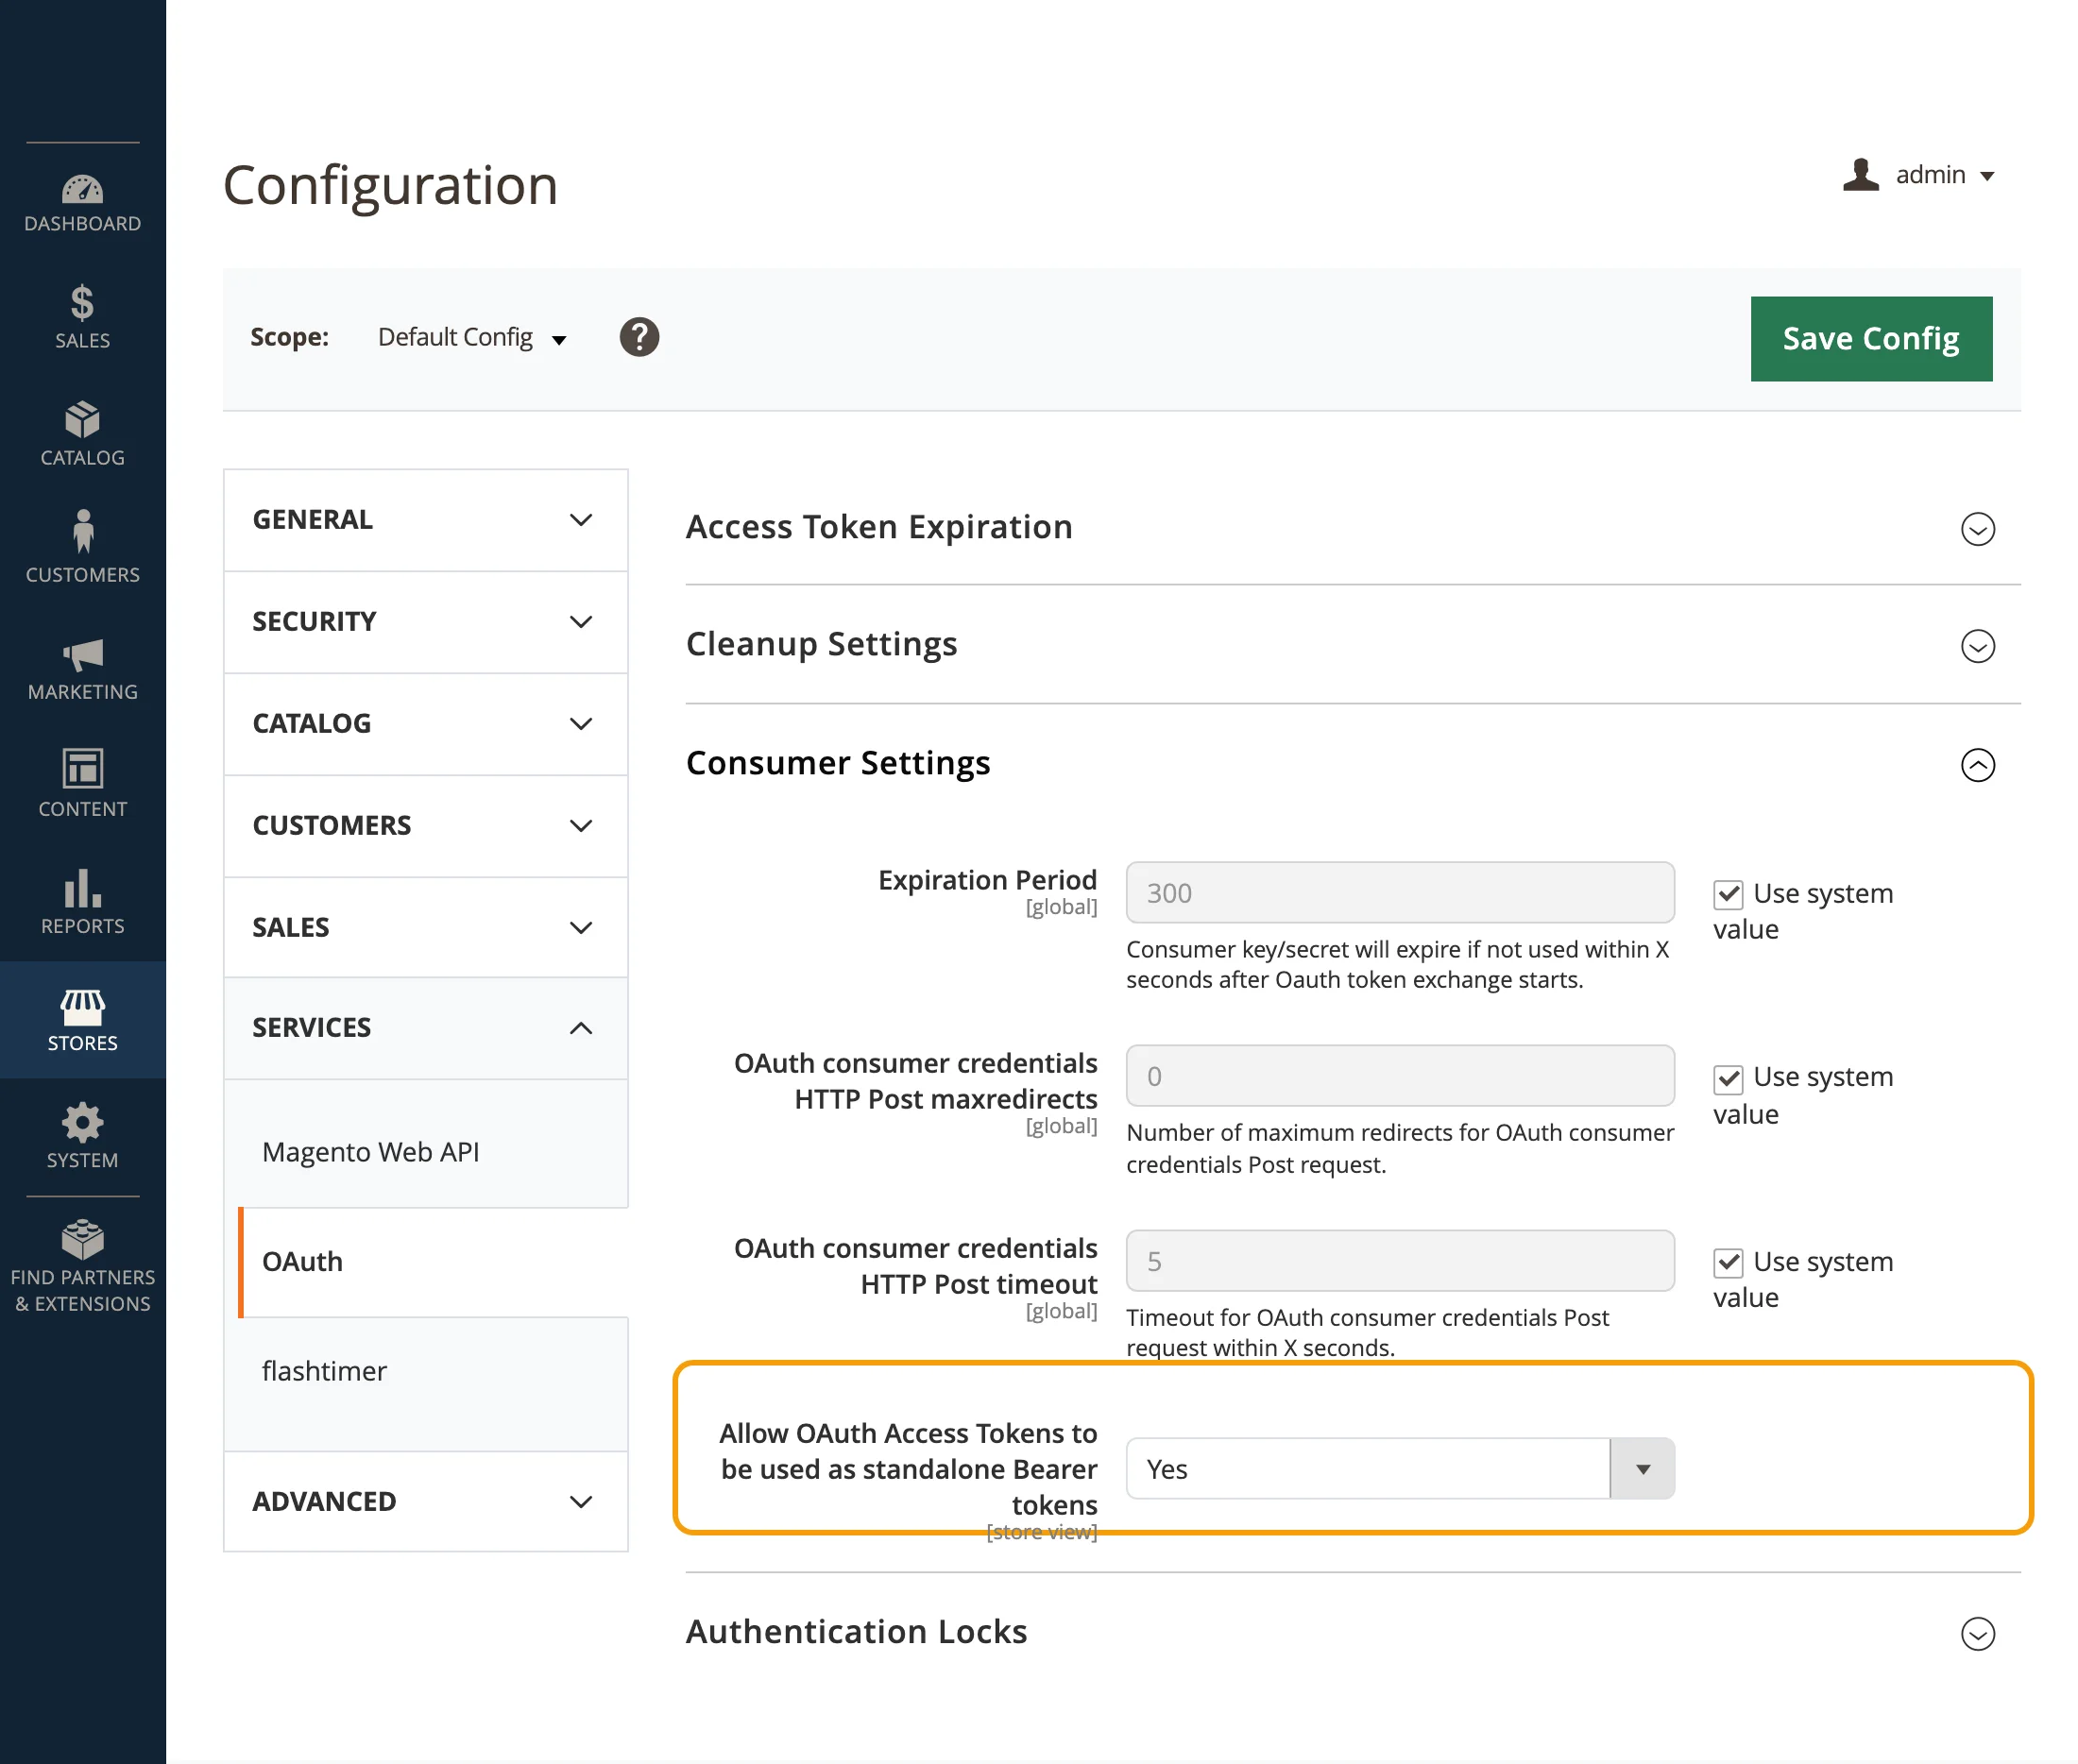
- In flashtimer
Step 8: In flashtimer, paste your store's address and the token
In flashtimer, go to Settings → Integrations, open the E-commerce tab and click Adobe Commerce (Magento).
In Store URL, type the address your shop opens at, starting with https://, like
https://your-store.com. Not the admin's address. In Access Token, paste the token from step 6. Leave the three Cloud Service fields empty and click Connect Adobe Commerce (Magento).app.flashtimer.com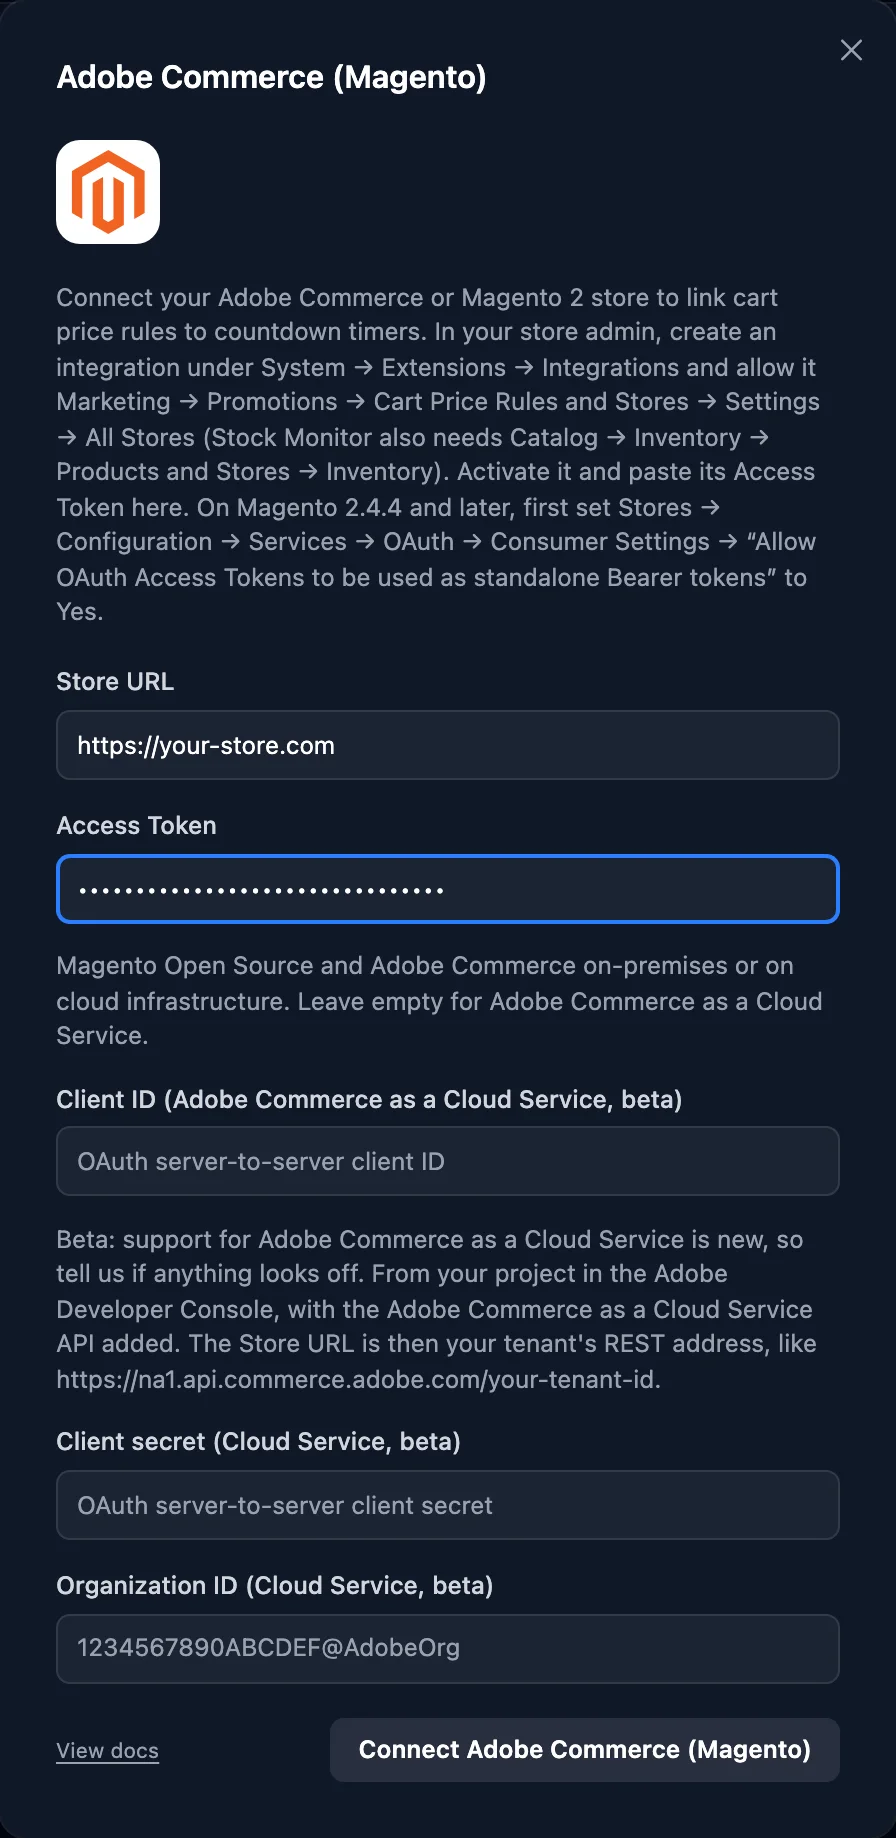
- In flashtimer
Step 9: Connected: choose what flashtimer does by itself
The dialog shows Connected, your store's address and the time zone your sale dates are read in. From now on flashtimer checks your store every few minutes.
Under Automation, tick what you want done for you. Auto-create timers makes a timer for each new cart price rule, Auto-update timers moves a timer's end when you change the rule's dates, and Auto-archive timers puts a timer away when its rule is switched off or deleted. Everything is off until you tick it, and your choice is saved as you make it.
That's the connection done. The next two steps are optional.
app.flashtimer.com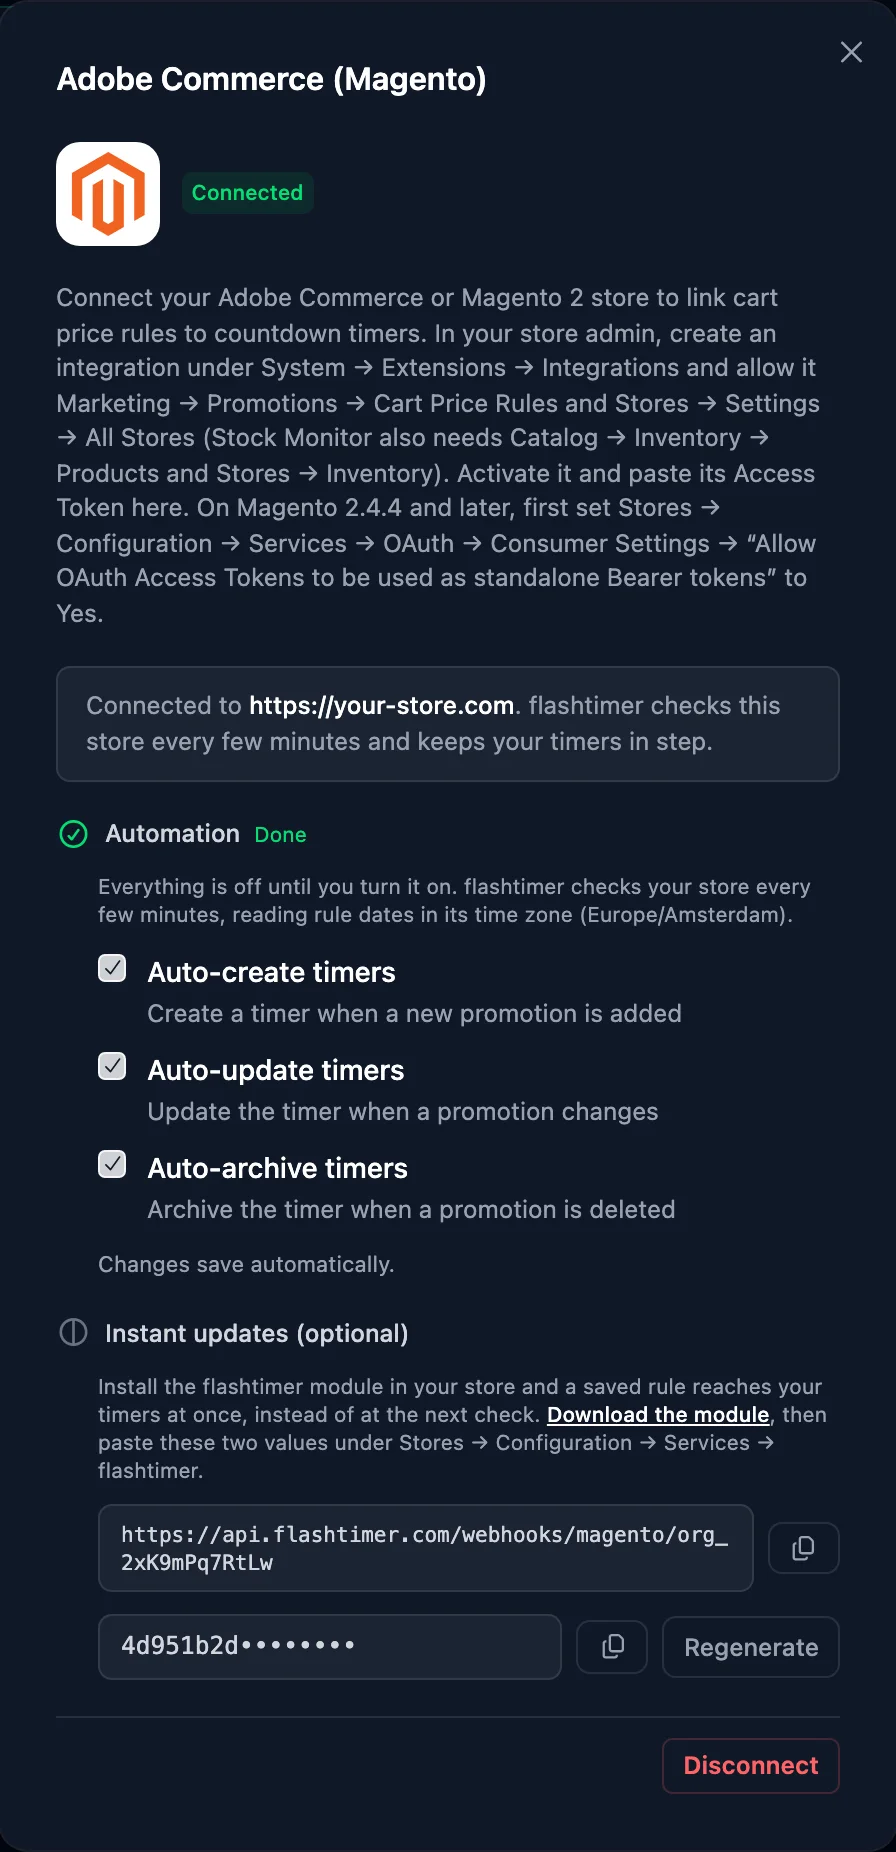
- In flashtimerOptional
Step 10: For instant updates, download the module for your developer
Without anything more, a change in your store reaches your timers within a few minutes. If you want it within seconds, your store needs flashtimer's small free module, which tells flashtimer the moment a cart price rule is saved or deleted. It sends the rule's name, dates and status, and nothing about customers or orders.
Click Download the module and send the file to whoever looks after your store's server: your developer or agency. Installing it is a routine job for them. They unzip it into
app/code/Flashtimer/Syncand runbin/magento module:enable Flashtimer_Sync,bin/magento setup:upgradeandbin/magento cache:flush.app.flashtimer.com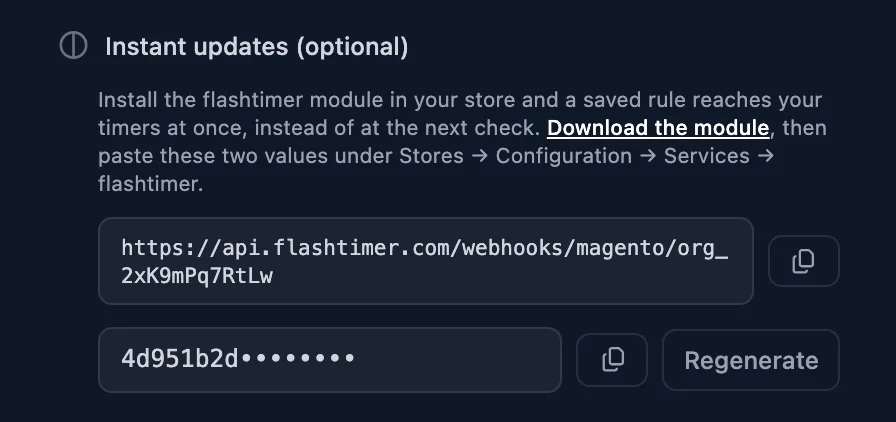
- In Adobe CommerceOptional
Step 11: Paste flashtimer's two values into the module
Once the module is installed, go to Stores → Configuration in your store's admin, open Services and click flashtimer.
Copy the address from flashtimer's dialog into Webhook URL and the secret into Webhook signing secret (the copy buttons next to each give you the whole value). Set Enabled to Yes and click Save Config.
To check it, change a rule's end date in your store: the timer linked to it follows within seconds.
your-store.com/admin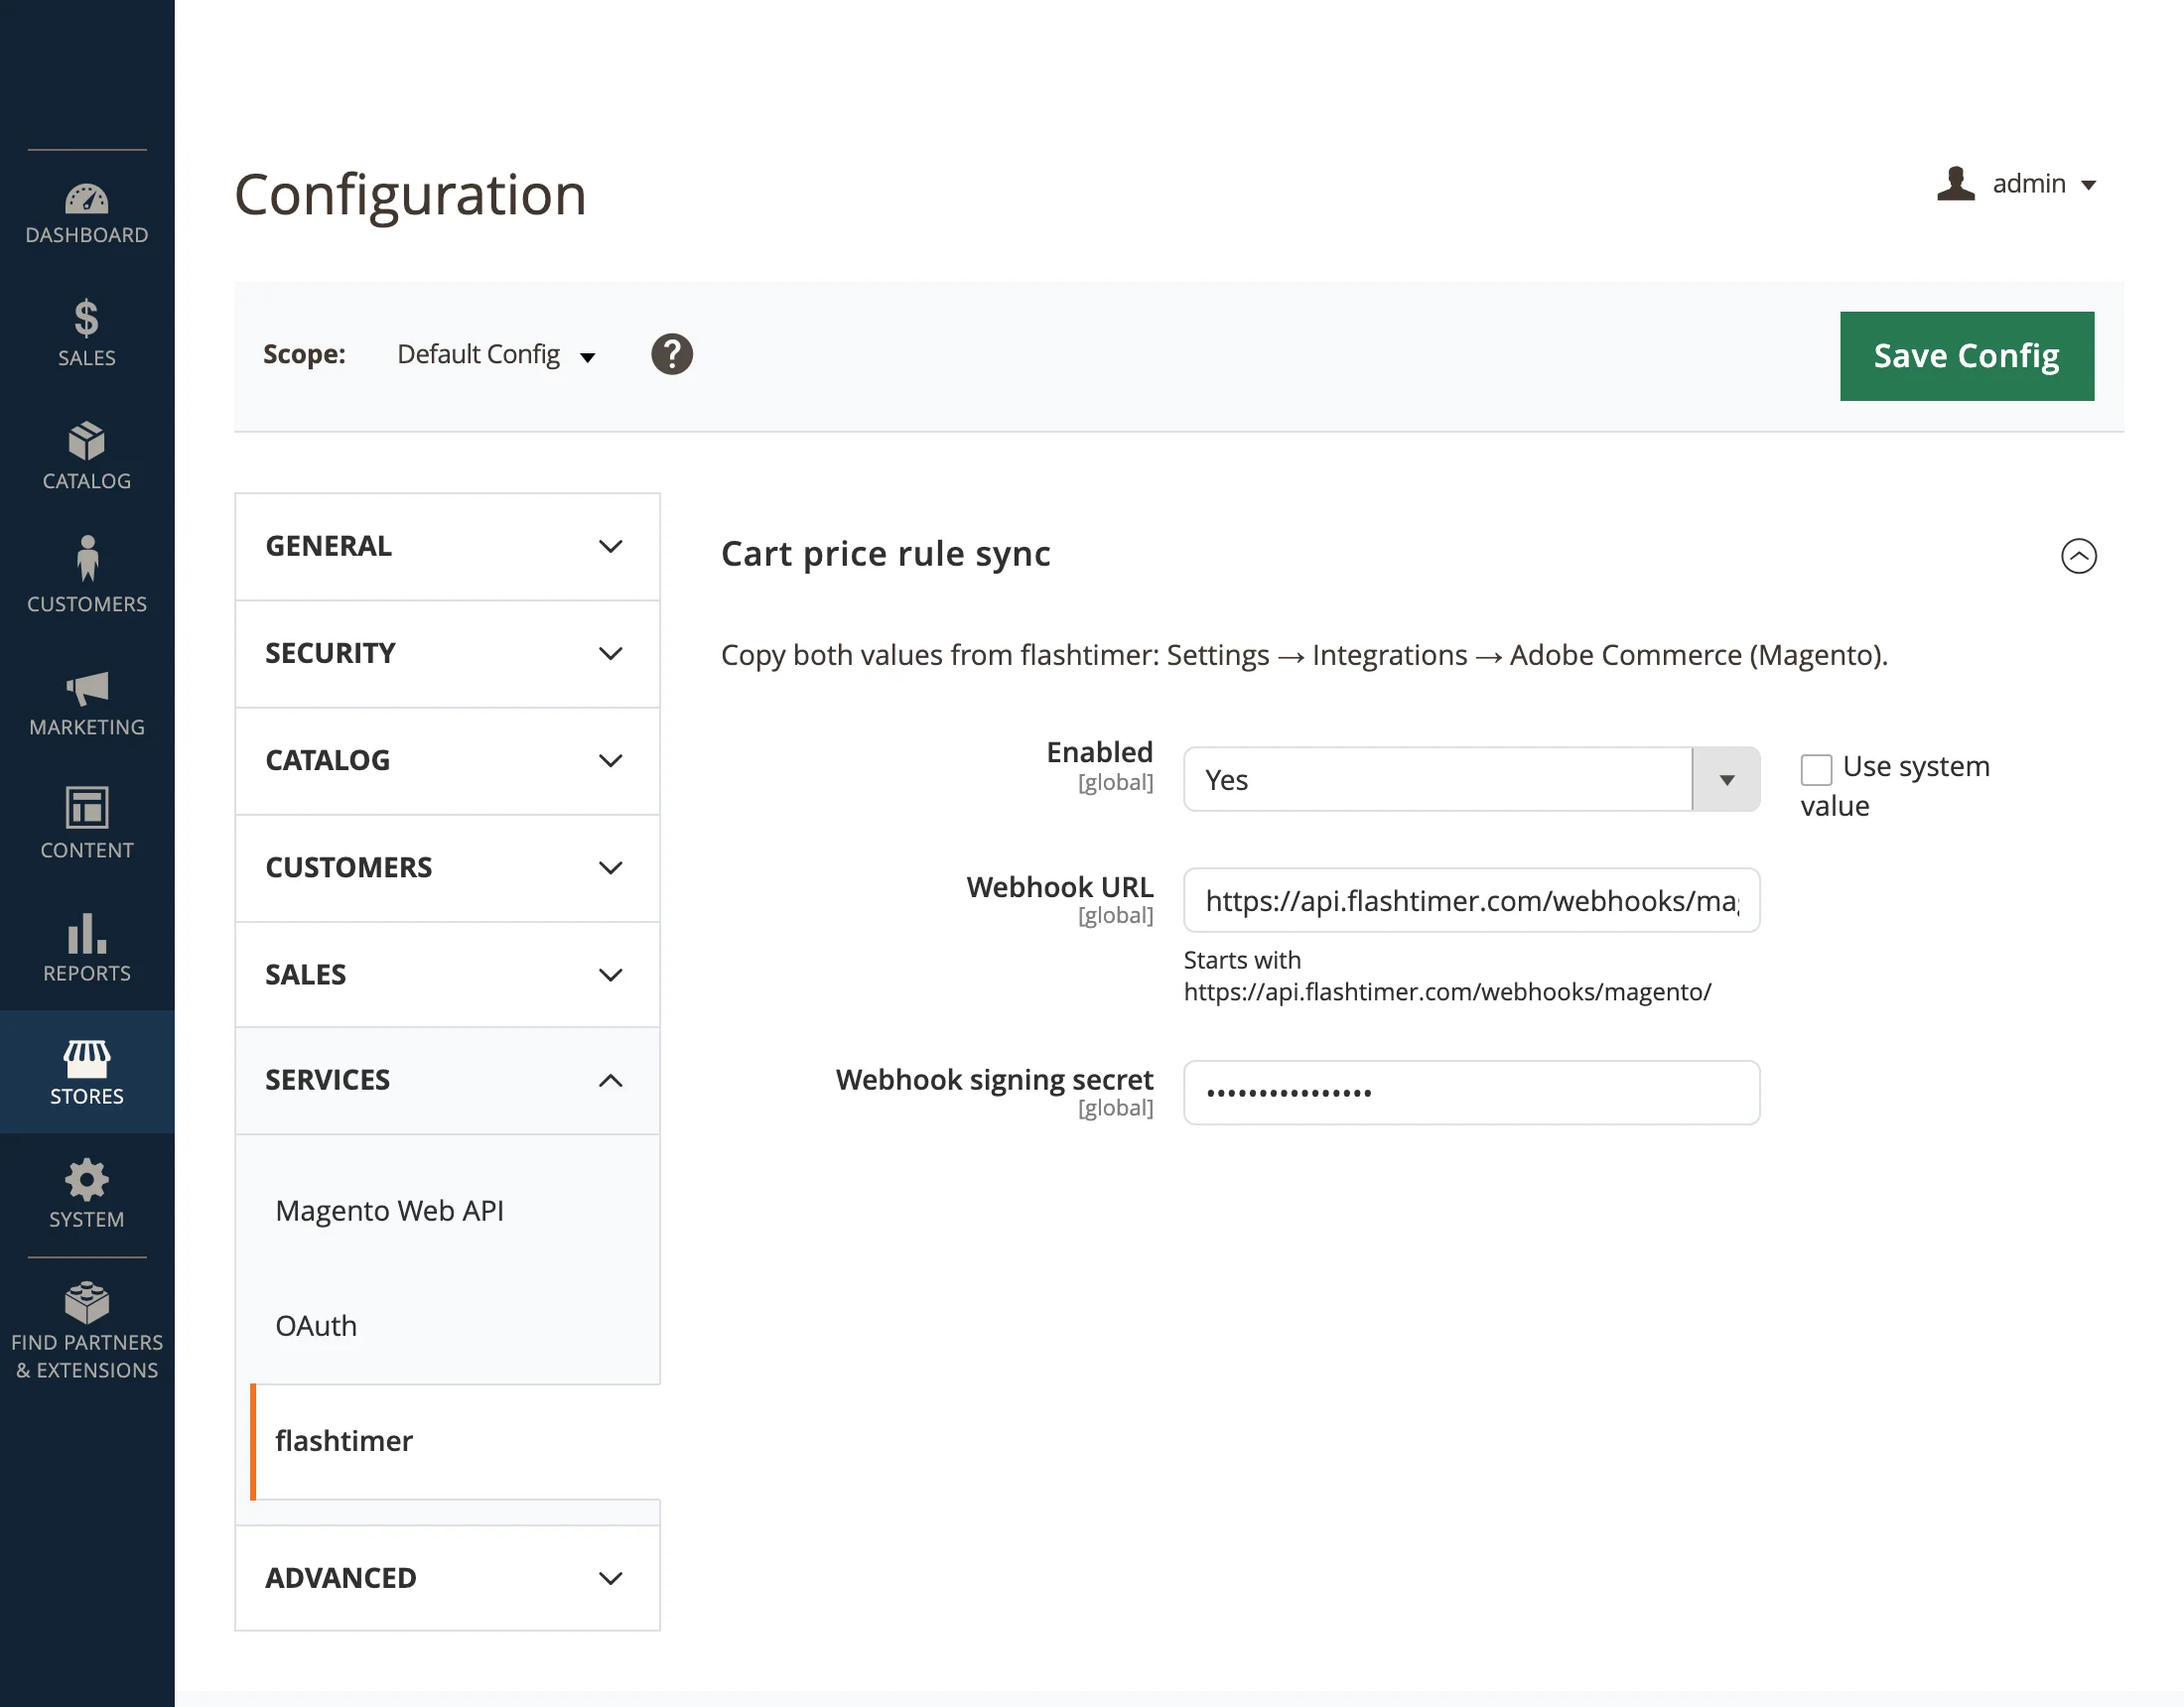
Once connected
What you can do next
Make a timer from a cart price rule
Pro and upOn the Timers page, open the arrow next to New timer and under Import choose Adobe Commerce (Magento). Pick a rule and click Create timer: it counts down to the rule's end date. A timer you make this way tells you when the rule's date changes and offers to Sync.
Let new sales become timers by themselves
Pro and upWith Auto-create timers on, every new cart price rule with an end date gets a timer within a few minutes, and with Auto-update and Auto-archive on it follows the rule from then on without you.
End a timer when a product sells out
BusinessOpen a timer, go to Automations and add a Stock Monitor: pick a product by name or SKU and the stock level at which the timer should end.
Manage
Manage the connection
- Disconnect
- In Settings → Integrations → Adobe Commerce (Magento), click Disconnect. Your timers stay and keep counting down; they stop following your store. To take the key away too, delete the flashtimer integration in your store's admin.
- Replace the token
- Click Reauthorize on the integration's row in your store, copy the new Access Token and connect again in flashtimer with it. Your Automation choices are kept.
- Connect another store
- An organization connects one store at a time. Connect with the other store's address and token: timers that followed the old store are let go of, so they never follow a rule from the wrong shop.
- New secret for the module
- Click Regenerate next to the secret in flashtimer's dialog, then paste the new one under Stores → Configuration → Services → flashtimer in your store.
Troubleshooting
If something doesn't work
Most problems show a message on flashtimer's Integrations page. Here's what each one means and what to do.
- “Adobe Commerce refused the access token.”
- Three things cause this, and the message is the same for each. Do step 7 if you skipped it. Check that the integration is Active in your store. And check that you pasted the Access Token, not one of the other three values. If the message names something to allow, tick that box on the integration's API tab, save and reauthorize.
- “There is no Adobe Commerce API at this address.”
- The Store URL isn't your shop's own address. Use the one your shop opens at for customers, like
https://your-store.com, not the admin's address and not a single page of the shop. - “Your store redirects to …”
- Your shop lives at a slightly different address, usually with or without www. Connect again with the address the message names.
- “Site URL must start with https://.”
- Type the whole address, starting with https://. A store that only answers on http can't be connected.
- “Your store asks for a username and password before it answers”
- A test or staging store is often locked behind a password prompt, and flashtimer can't get past it. Ask your developer to let requests to
/restthrough, or connect the live store. - “Something in front of your store … blocked flashtimer with HTTP 403.”
- A firewall or bot protection stopped flashtimer before it reached your store. Ask whoever runs it to allow requests to
/rest/V1. - I changed a rule's date and my timer didn't move
- A timer you made yourself from a rule, or linked by hand, doesn't change on its own: open it and click Sync to the new date. Timers that flashtimer created through Auto-create follow the rule themselves, within a few minutes, as long as Auto-update timers is ticked.
- My new rule didn't become a timer
- Check that Auto-create timers is ticked, that the rule is Active in your store and that its To date hasn't passed. Then give it a few minutes: flashtimer checks on a schedule unless the module is installed.
Still stuck? Contact support.
Questions
Answered before you ask.
Keep reading
- IntegrationsWorks with 40+ email, e-commerce and automation platformsKlaviyo, Mailchimp, Shopify, HubSpot and every ESP that shows images.
- DevelopersCountdown timer API & MCP serverCreate and embed timers from code, Claude, ChatGPT, Gemini or Grok.
- Use casesEmail countdown timer use casesAbandoned carts, Black Friday, launches and more.